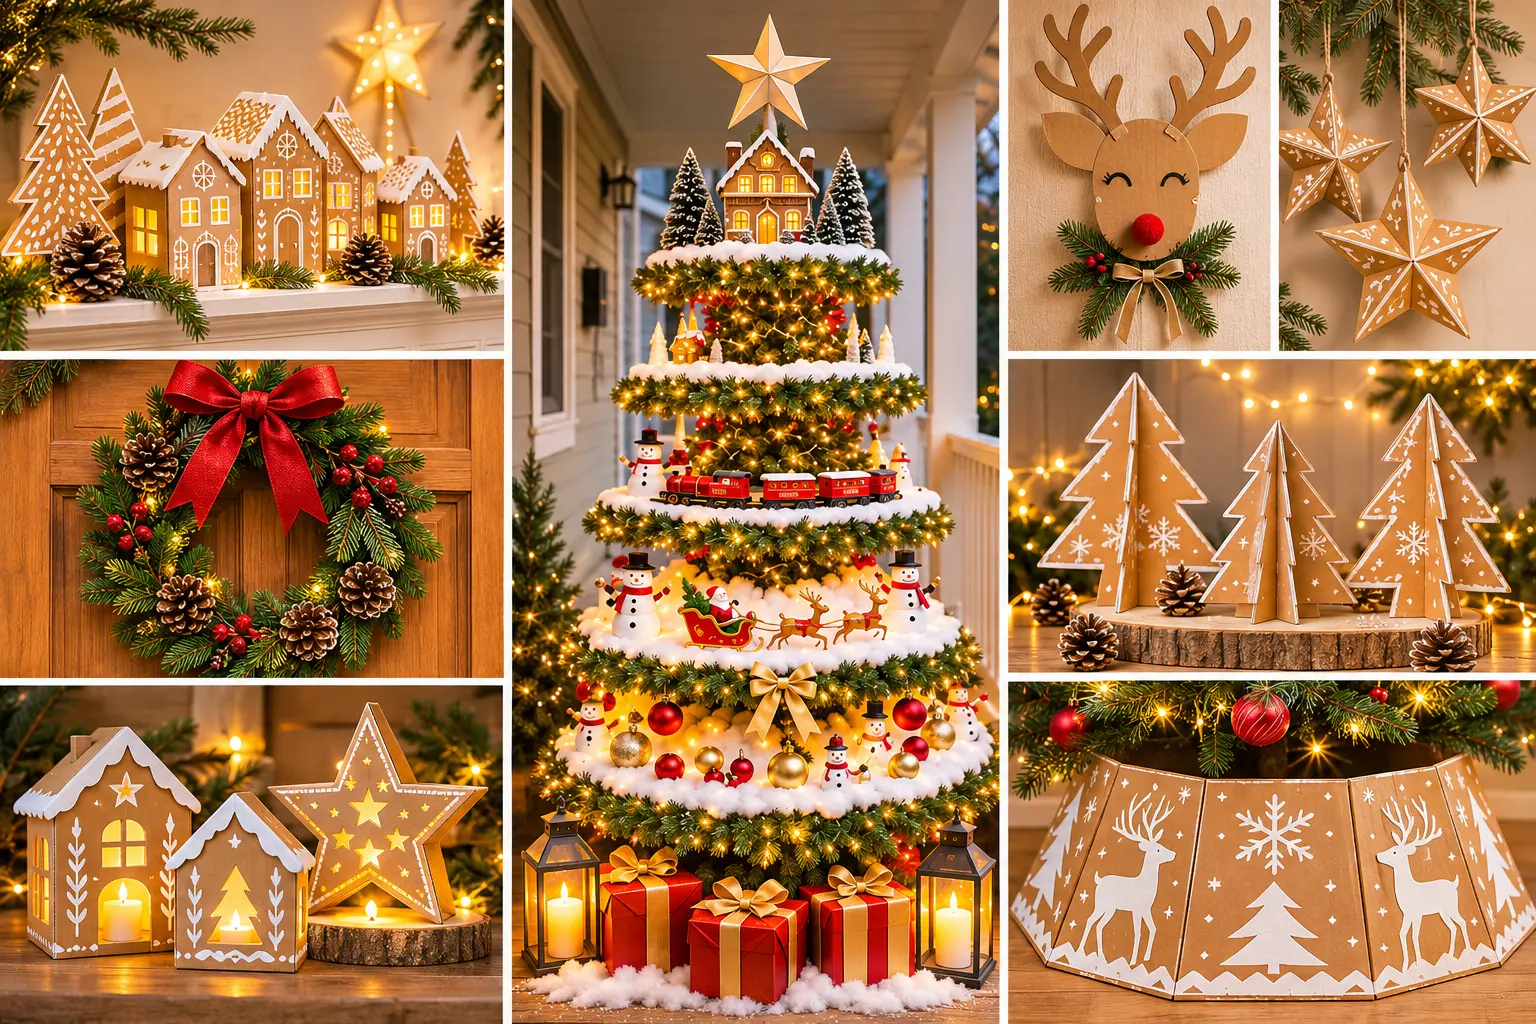
Christmas decorations don’t have to be expensive to look beautiful. With a few cardboard boxes, some white paint, and a little creativity, you can make charming holiday decorations that feel warm, festive, and unique.
From rustic gingerbread houses to adorable reindeer ornaments, cardboard Christmas crafts are an affordable way to decorate your home while reusing everyday materials.
Whether you’re decorating your mantel, creating a Christmas village, or enjoying a fun afternoon with your family, these 21+ DIY cardboard Christmas crafts offer plenty of inspiration.
Let’s get crafting!
Table of Contents
Cardboard Christmas Crafts for a Cozy Holiday Home
Cardboard is perfect for creating rustic Christmas decorations. Its natural brown color looks beautiful with white paint, evergreen branches, twine, and warm fairy lights.
These larger projects can transform your living room, mantel, or dining table.
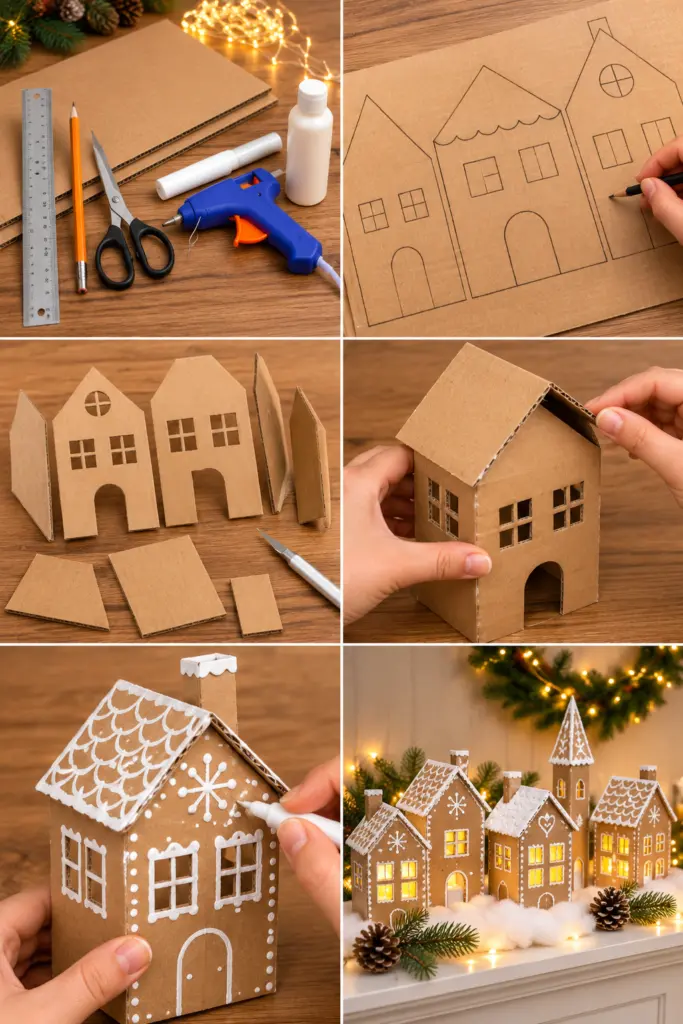
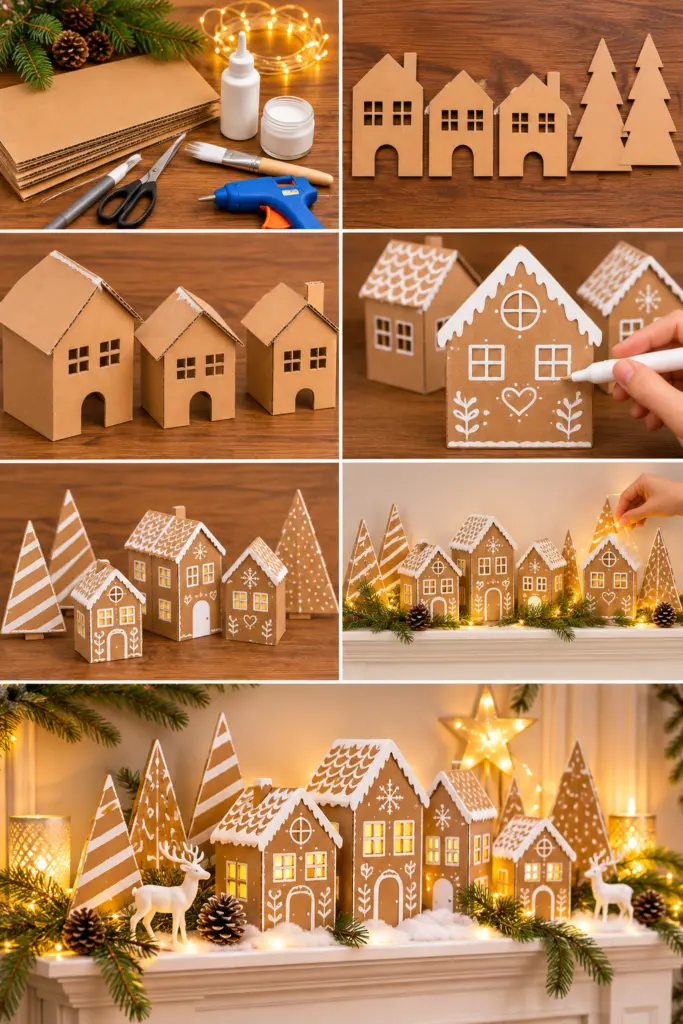
DIY Cardboard Christmas Village
A cardboard Christmas village is one of the most beautiful ways to decorate your home for the holidays.
Imagine a row of tiny brown houses with white painted windows, snowy rooftops, and delicate details. Arrange them on a mantel or tabletop, and you’ve created a charming winter scene without spending much money.
Materials:
- Cardboard boxes or sheets
- Pencil and ruler
- Craft knife or scissors
- White acrylic paint or paint markers
- Hot glue or craft glue
- Battery-operated fairy lights (optional)
How to make it:
- Draw simple house shapes on your cardboard.
- Cut out the front, back, and side panels.
- Create windows, doors, and small decorative details.
- Assemble the pieces using glue.
- Paint white snow patterns, window frames, and roof details.
- Arrange the finished houses together to create a village.
For a more magical effect, place battery-operated tea lights inside the houses. The soft glow will make your cardboard village feel warm and inviting.
Rustic Cardboard Christmas Trees
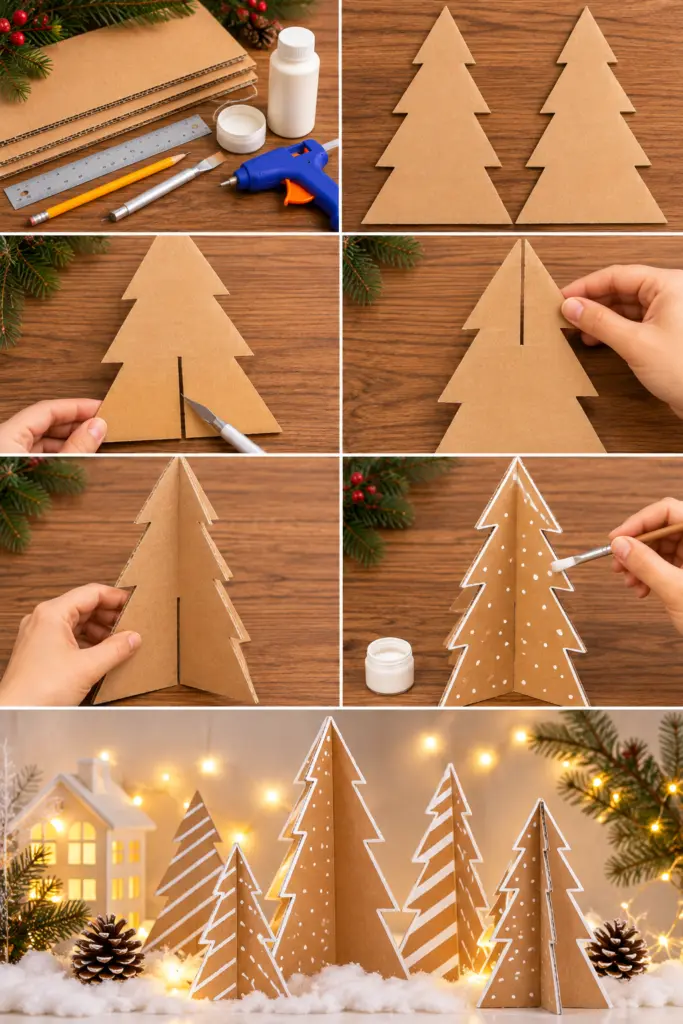
Cardboard Christmas trees are perfect for anyone who loves minimalist holiday decorations.
These trees can be made in different sizes and displayed together to create a small forest. They look especially beautiful when decorated with white paint, twine, or tiny lights.
Materials:
- Thick corrugated cardboard
- Pencil
- Ruler
- Craft knife
- White paint
- Glue
- Small pieces of cardboard for the base
How to make it:
- Draw a tall triangular tree shape on cardboard.
- Cut out two identical tree shapes.
- Cut a narrow slit from the bottom to the middle of one tree.
- Cut another slit from the top to the middle of the second tree.
- Slide the two pieces together to create a standing 3D tree.
- Decorate with white dots, stripes, or snowy edges.
You can make several trees in different heights to create a beautiful Christmas centerpiece.
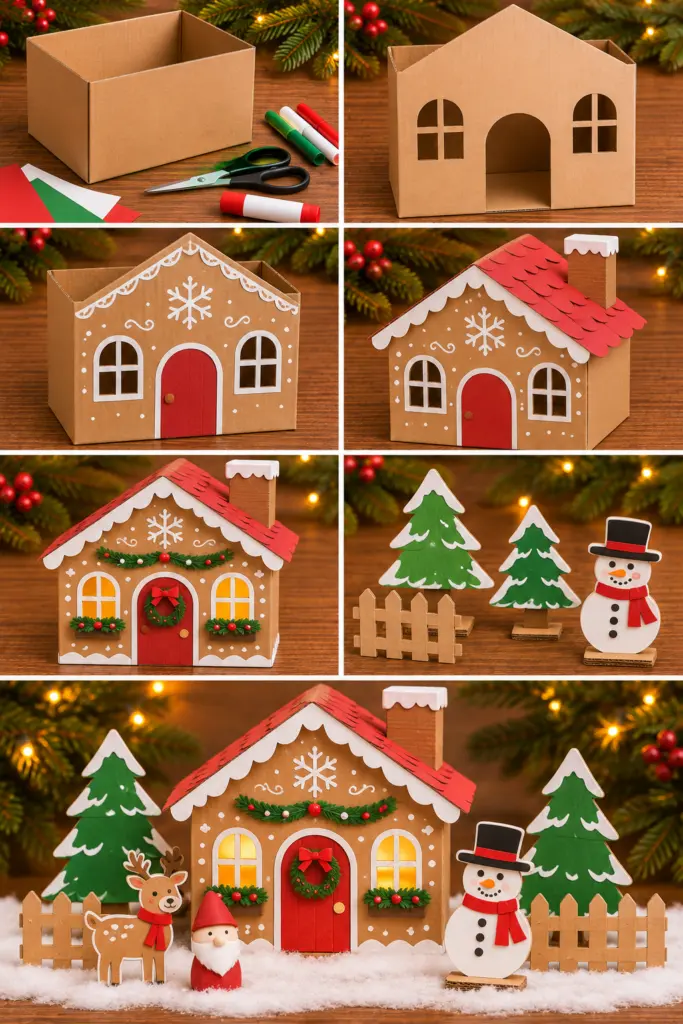
Cardboard Gingerbread Houses
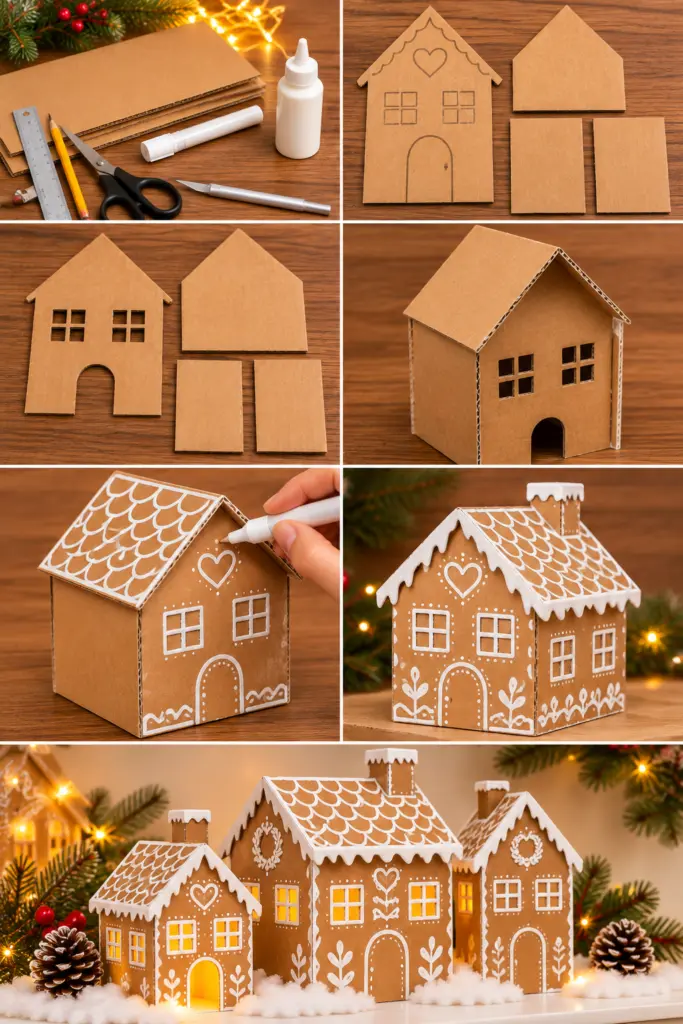
Who says gingerbread houses have to be edible?
Cardboard gingerbread houses are a wonderful alternative that can be displayed throughout the holiday season. They look like real gingerbread creations when decorated with white paint that resembles icing.
Use brown cardboard as your base and add intricate designs with a white paint pen.
Materials:
- Cardboard
- White paint marker
- Pencil
- Scissors or craft knife
- Glue
How to make it:
- Draw a simple house shape with a triangular roof.
- Cut out the front and back panels.
- Cut out two side panels.
- Assemble the house using glue.
- Add white icing-style decorations around the windows, doors, and roof.
- Create tiny snowflakes, hearts, and decorative lines.
For a beautiful display, make several houses in different sizes and arrange them on a mantel with evergreen branches.
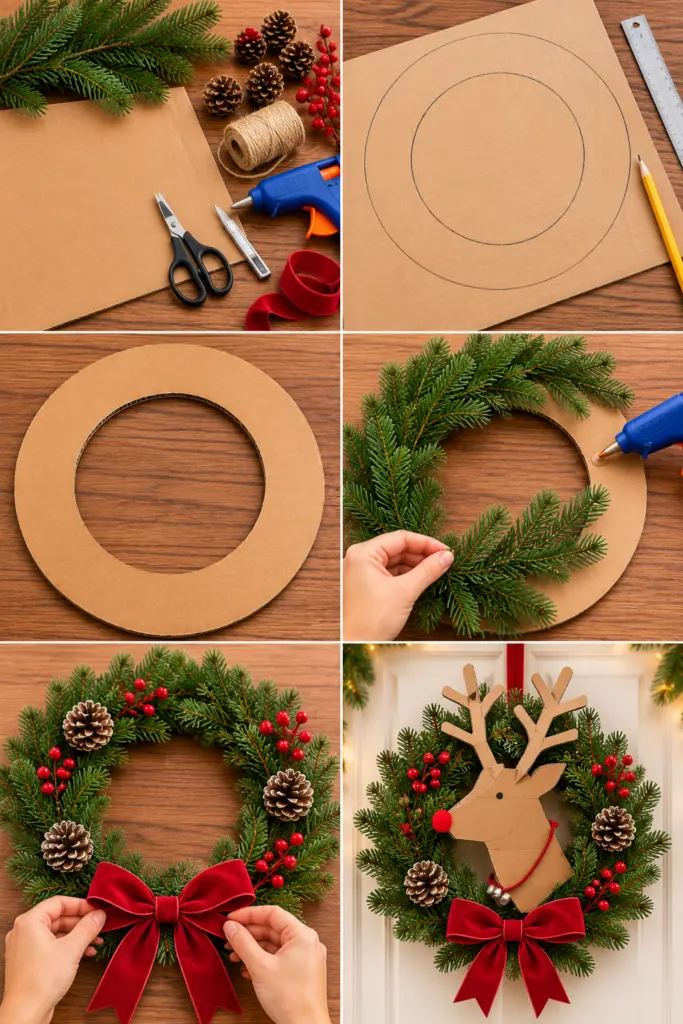
Cardboard Christmas Wreath
A handmade cardboard wreath is a creative way to decorate your front door or interior walls.
Instead of using a traditional foam wreath base, cut a large ring from cardboard and decorate it with natural materials.
Materials:
- Thick cardboard
- Craft knife
- Evergreen branches
- Pinecones
- Twine
- Hot glue
- Red ribbon
How to make it:
- Draw a large circle on cardboard.
- Draw a smaller circle inside it.
- Cut out the ring.
- Attach evergreen branches around the cardboard base.
- Add pinecones and small decorative berries.
- Finish with a red ribbon or rustic twine bow.
You can also create a cardboard reindeer head and attach it to the wreath for a playful Christmas decoration.
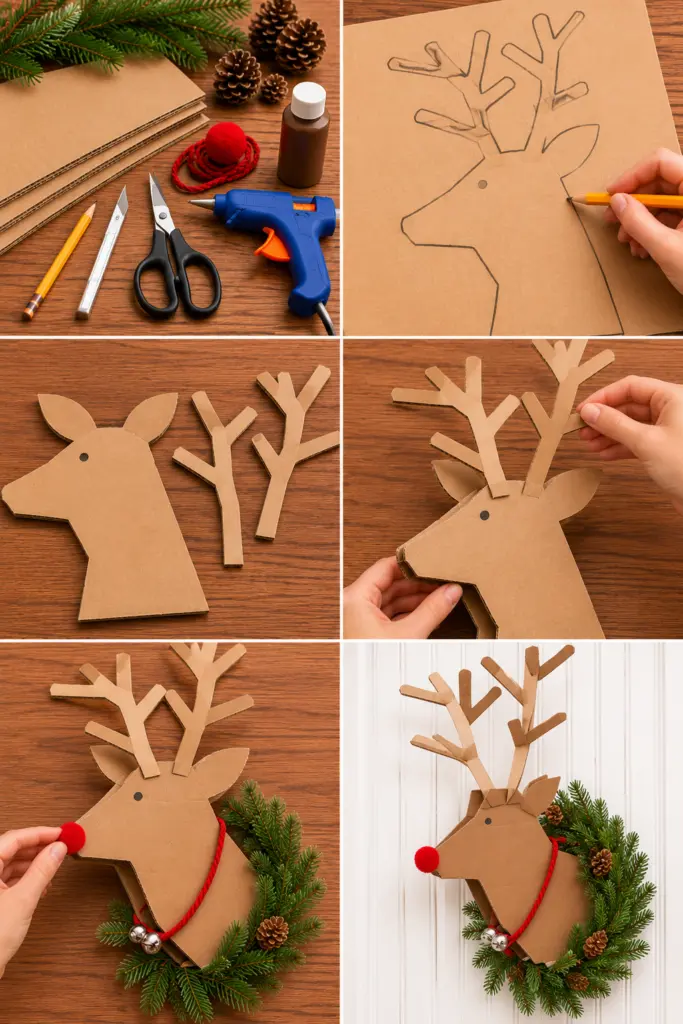
Cardboard Reindeer Wall Decoration
A cardboard reindeer is a charming addition to rustic Christmas decor.
Inspired by the handmade reindeer decorations in our reference images, this project uses simple cardboard shapes to create a statement wall decoration.
Materials:
- Thick cardboard
- Pencil
- Craft knife
- Brown paint
- Red pom-pom
- Twine
- Evergreen branches
How to make it:
- Draw a reindeer head and neck on cardboard.
- Cut out the shape carefully.
- Create separate antlers from cardboard strips.
- Attach the antlers to the head.
- Add a small red pom-pom for the nose.
- Attach a loop of twine to hang it.
- Decorate the neck with evergreen branches.
This craft looks beautiful above a mantel or as part of a rustic Christmas wreath.
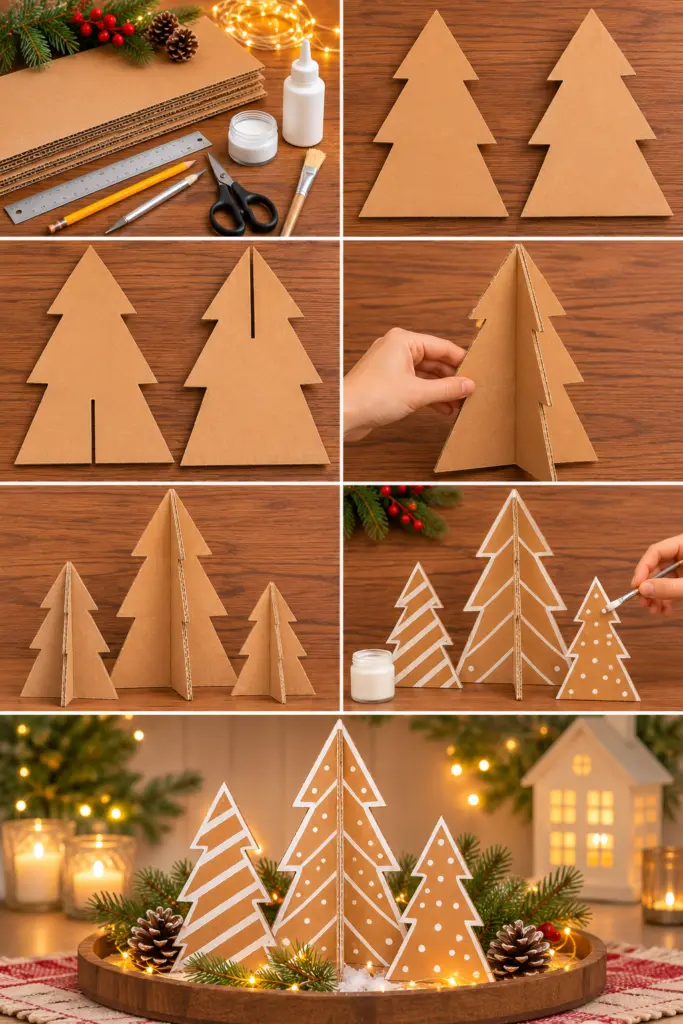
Cardboard Christmas Tree Centerpiece
A cardboard Christmas tree centerpiece is a lovely way to decorate your dining table.
You can make a small forest of standing cardboard trees and decorate them with natural greenery, fairy lights, or white paint.
Materials:
- Corrugated cardboard
- Pencil
- Ruler
- Scissors
- Glue
- White paint
- Battery-operated fairy lights
How to make it:
- Draw several triangular tree shapes.
- Cut out two matching pieces for each tree.
- Create slots so the pieces can fit together.
- Assemble the trees.
- Paint white patterns or add decorative details.
- Arrange them on a wooden tray with greenery.
The natural brown cardboard creates a cozy look that works beautifully with neutral Christmas decor.
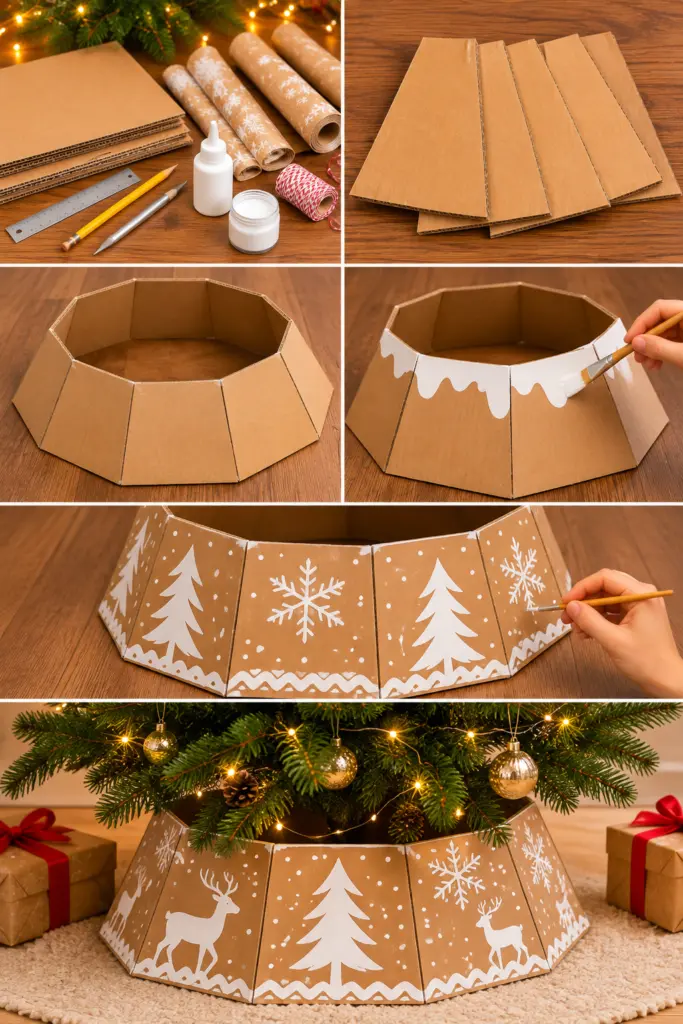
Cardboard Christmas Tree Skirt
If you want a creative way to hide the base of a small artificial Christmas tree, consider making a decorative cardboard tree skirt.
This project is especially useful for tabletop Christmas trees or small decorative trees.
Materials:
- Large cardboard sheets
- Pencil
- Ruler
- Craft knife
- Glue
- White paint
- Decorative paper
How to make it:
- Measure the base of your Christmas tree.
- Cut cardboard panels to create a circular or polygonal cover.
- Assemble the panels around the tree base.
- Decorate with white paint, wrapping paper, or rustic patterns.
This is a practical way to reuse cardboard while creating a coordinated Christmas display.
Cardboard Christmas Mantel Village
A cardboard Christmas mantel village is an easy way to create a festive focal point.
You can combine small houses, trees, stars, and evergreen branches to create a beautiful winter scene.
Materials:
- Cardboard
- White paint
- Glue
- Fairy lights
- Evergreen branches
- Small decorative figures
How to make it:
- Create several cardboard houses.
- Make small trees in different sizes.
- Paint snow details on the rooftops.
- Arrange the houses along your mantel.
- Add fairy lights and evergreen branches.
- Place small decorative figures around the scene.
For a more elegant look, keep the colors simple: brown, white, green, and warm gold.
DIY Cardboard Christmas Ornaments and Gift Decorations
Small cardboard decorations are perfect for Christmas trees, gift wrapping, windows, and handmade holiday displays.
They’re also a wonderful opportunity to experiment with different shapes and designs. You can create stars, snowflakes, gingerbread-inspired ornaments, and tiny houses using simple cardboard cutouts.
Cardboard Gingerbread Star Ornaments
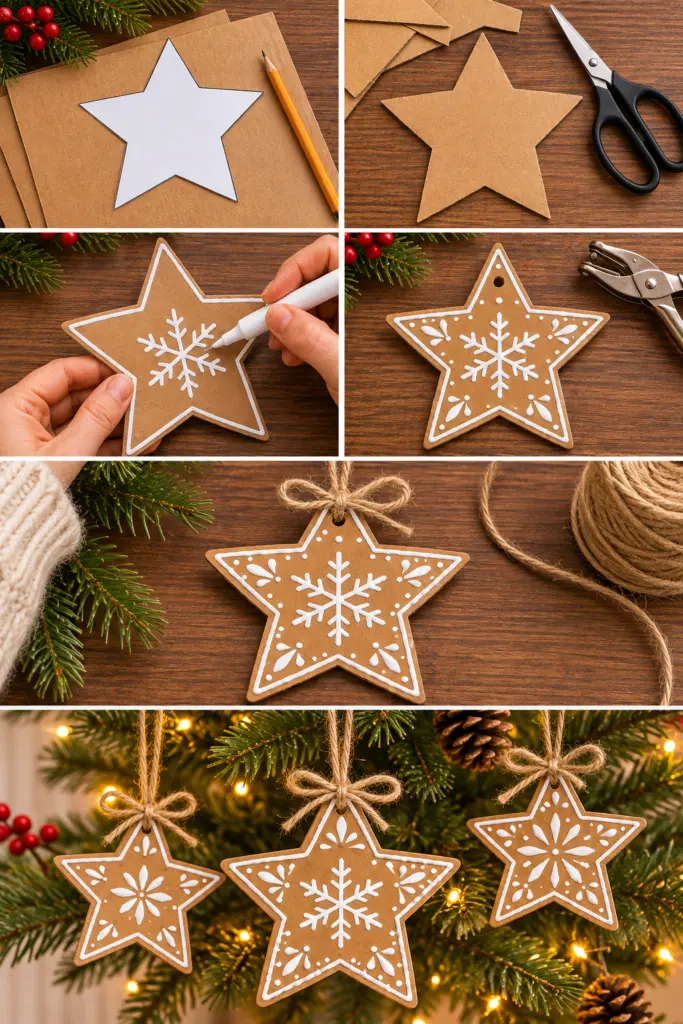
These cardboard stars are inspired by traditional gingerbread cookies.
They look beautiful when decorated with white icing-style patterns and hung on a Christmas tree using red ribbon or natural twine.
Materials:
- Thin cardboard
- Star template
- Scissors
- White paint marker
- Twine or ribbon
- Hole punch
How to make it:
- Trace a star shape onto cardboard.
- Cut out the star.
- Draw decorative white patterns.
- Add dots, lines, and small snowflakes.
- Punch a hole near the top.
- Attach a ribbon or twine loop.
You can make a collection of different-sized stars for a coordinated Christmas tree.
Cardboard Gingerbread Heart Ornaments
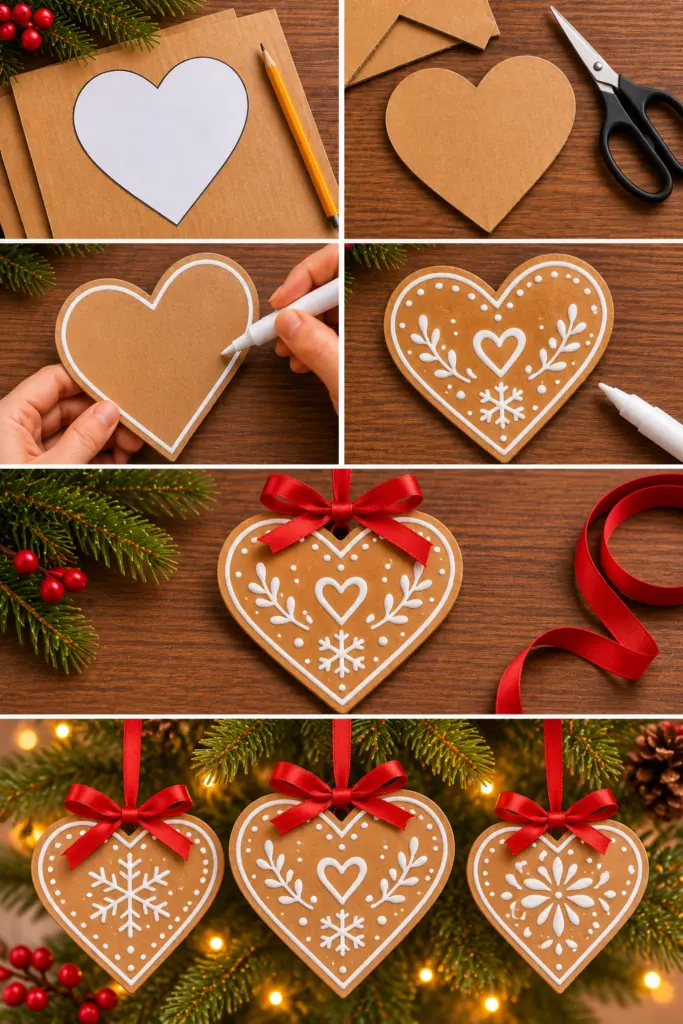
Heart-shaped cardboard ornaments are simple, charming, and perfect for handmade Christmas gifts.
Use white decorative patterns to create a gingerbread-inspired appearance.
Materials:
- Cardboard
- Heart template
- Scissors
- White paint marker
- Ribbon
- Glue
How to make it:
- Draw a heart shape on cardboard.
- Cut it out.
- Add a white border around the edges.
- Draw small hearts, dots, and decorative swirls.
- Attach a ribbon loop.
These ornaments look especially lovely when combined with stars and snowflakes.
Cardboard Snowflake Decorations
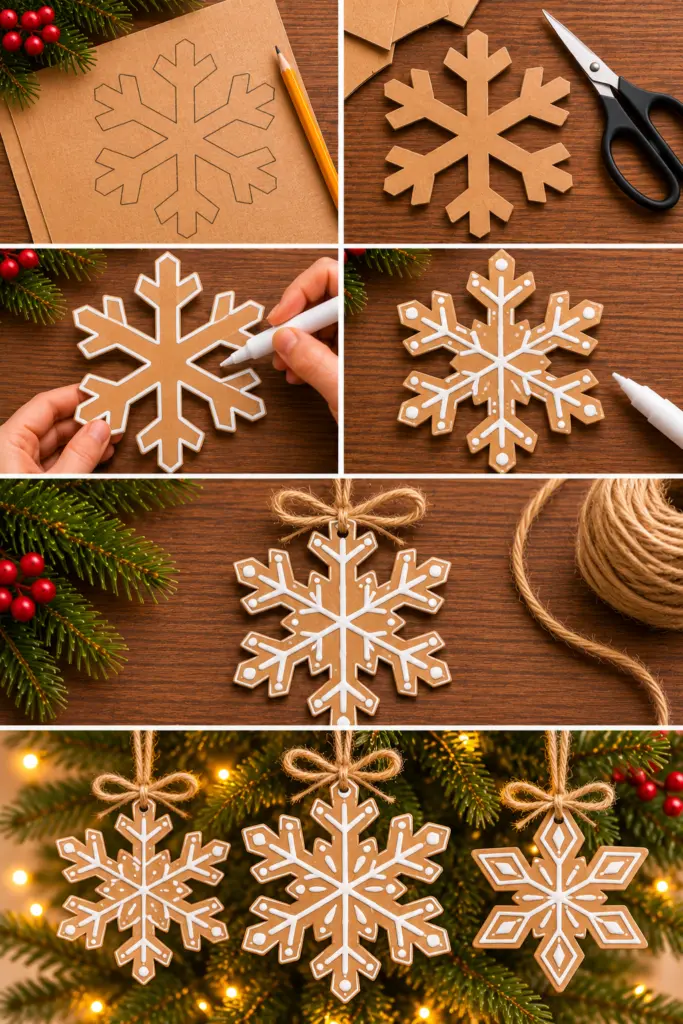
Snowflakes are classic Christmas decorations, and cardboard gives them a beautiful natural texture.
You can create simple six-pointed snowflakes or more detailed designs.
Materials:
- Thin cardboard
- Pencil
- Scissors
- White paint
- Twine
How to make it:
- Draw a snowflake design on cardboard.
- Cut out the shape.
- Add white paint to the edges.
- Draw decorative lines and dots.
- Attach twine for hanging.
Hang them in windows, on your Christmas tree, or above a dining table.
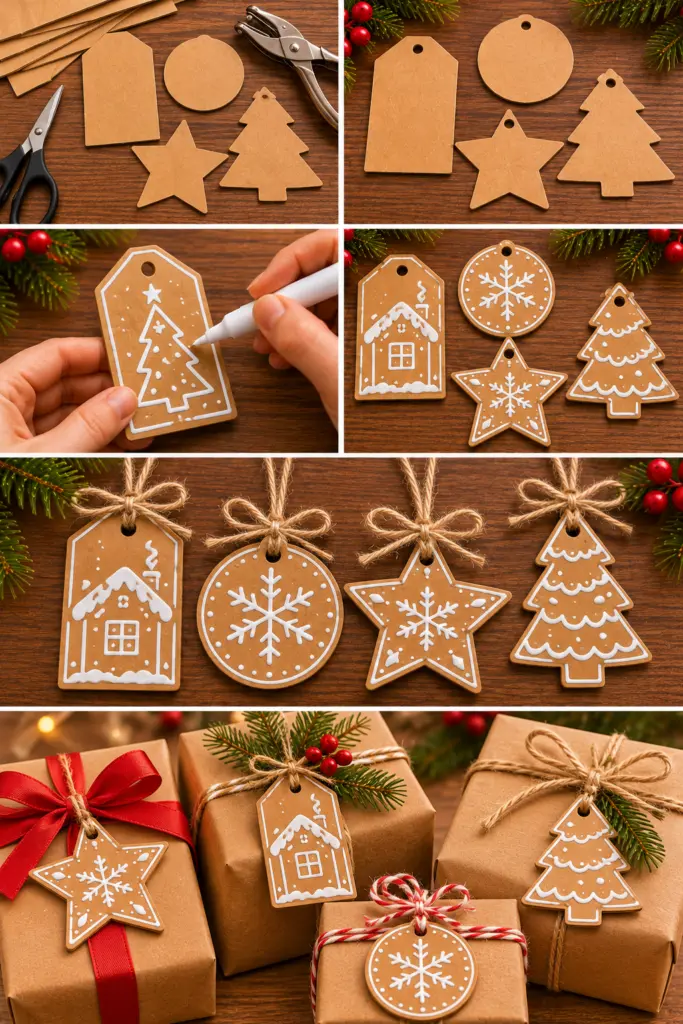
Cardboard Christmas Gift Tags
Instead of purchasing gift tags, make your own from leftover cardboard.
These tags are perfect for wrapping presents with kraft paper, natural twine, and simple ribbons.
Materials:
- Cardboard
- Scissors
- Hole punch
- White paint marker
- Twine
How to make it:
- Cut cardboard into small rectangles, circles, or stars.
- Punch a hole near the top.
- Write the recipient’s name.
- Add small Christmas designs.
- Attach the tag to a wrapped gift.
For a coordinated look, create matching gift tags for all your Christmas presents.
Cardboard Christmas Tree Gift Toppers
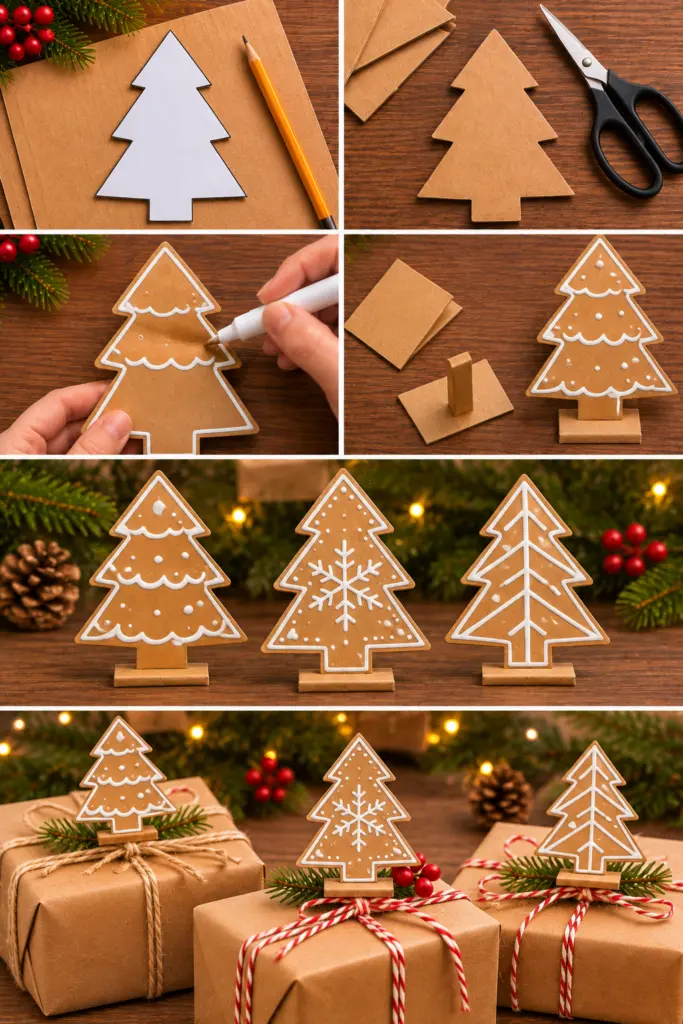
A handmade cardboard tree topper is a simple way to make your gifts look extra special.
These tiny trees can be attached to wrapped presents or used as decorative accents.
Materials:
- Cardboard
- Scissors
- Glue
- Twine
- White paint
How to make it:
- Cut out a small tree shape.
- Add decorative white lines.
- Create a small cardboard base.
- Attach the tree to the base.
- Glue the decoration onto a wrapped gift.
You can also make tiny stars or houses to match your gift-wrapping theme.
Cardboard Christmas Garland
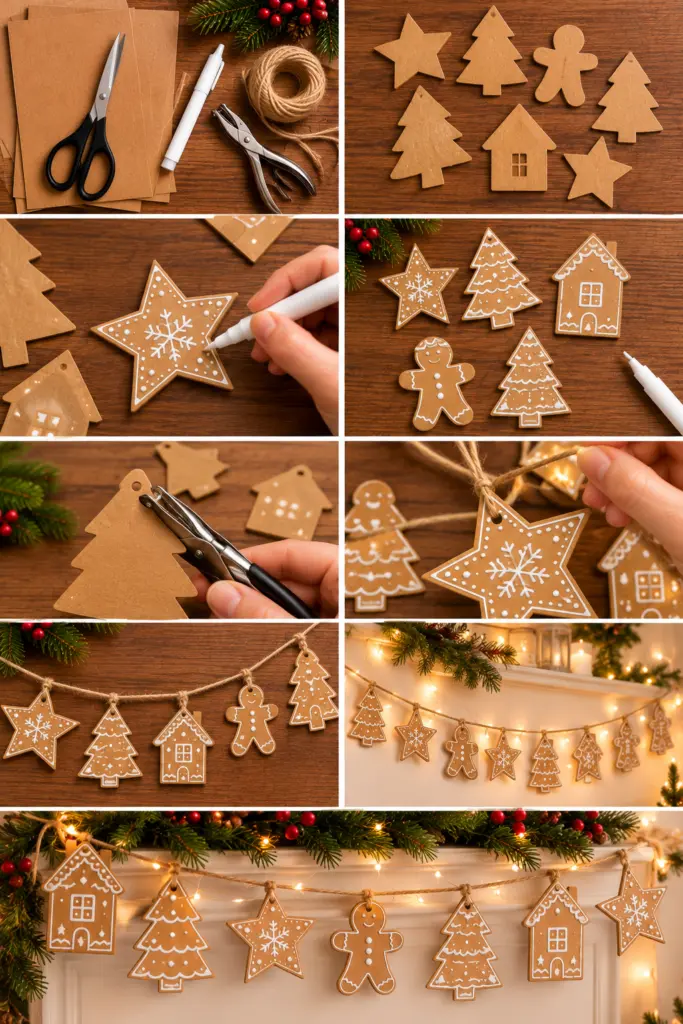
A cardboard garland is a lovely decoration for windows, mantels, and walls.
You can create a simple garland using stars, trees, houses, or gingerbread shapes.
Materials:
- Cardboard
- Scissors
- Twine
- White paint
- Hole punch
How to make it:
- Cut out several Christmas shapes.
- Decorate each shape with white paint.
- Punch holes near the top.
- Thread the shapes onto twine.
- Hang the garland wherever you want a festive touch.
Mixing different shapes creates a more playful and interesting design.
Cardboard Christmas Candle Holders
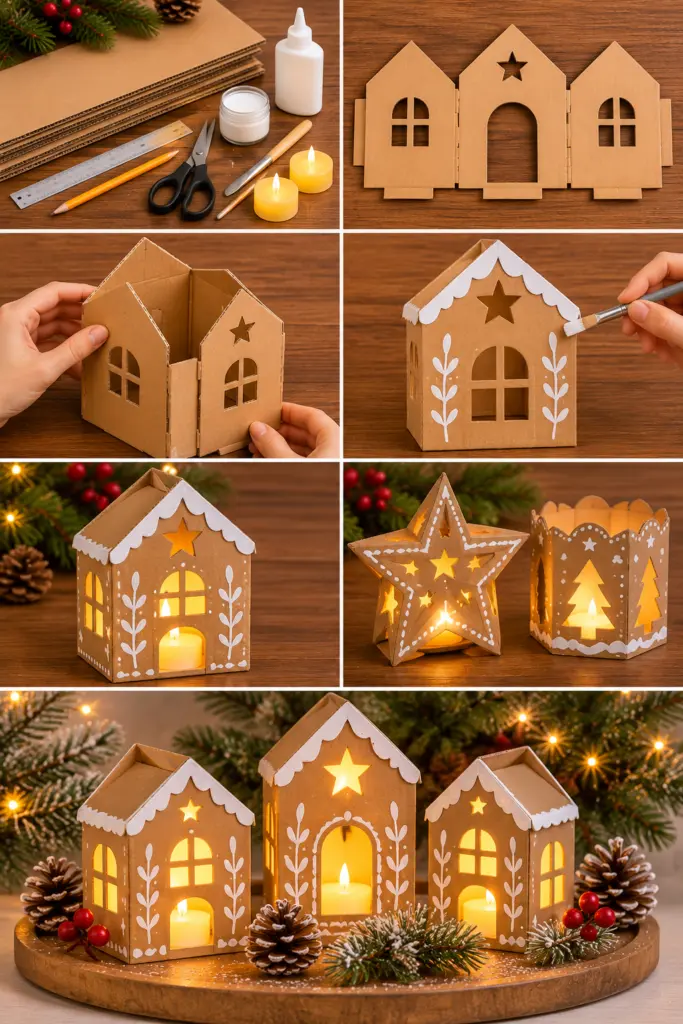
Cardboard can also be used to create decorative candle-holder surrounds.
For safety, use battery-operated candles rather than real flames.
Materials:
- Cardboard
- Scissors
- Glue
- White paint
- Battery-operated tea lights
How to make it:
- Cut cardboard into small decorative panels.
- Create simple house or star shapes.
- Assemble the panels around a battery-operated candle.
- Add white decorative details.
- Place the finished decoration on a table or mantel.
These decorations create a cozy atmosphere without the need for real candles.
Fun Cardboard Christmas Crafts for Kids and Families
Christmas crafting is a wonderful way to spend time with children.
These projects are simple, playful, and perfect for using cardboard tubes, cereal boxes, and leftover packaging.
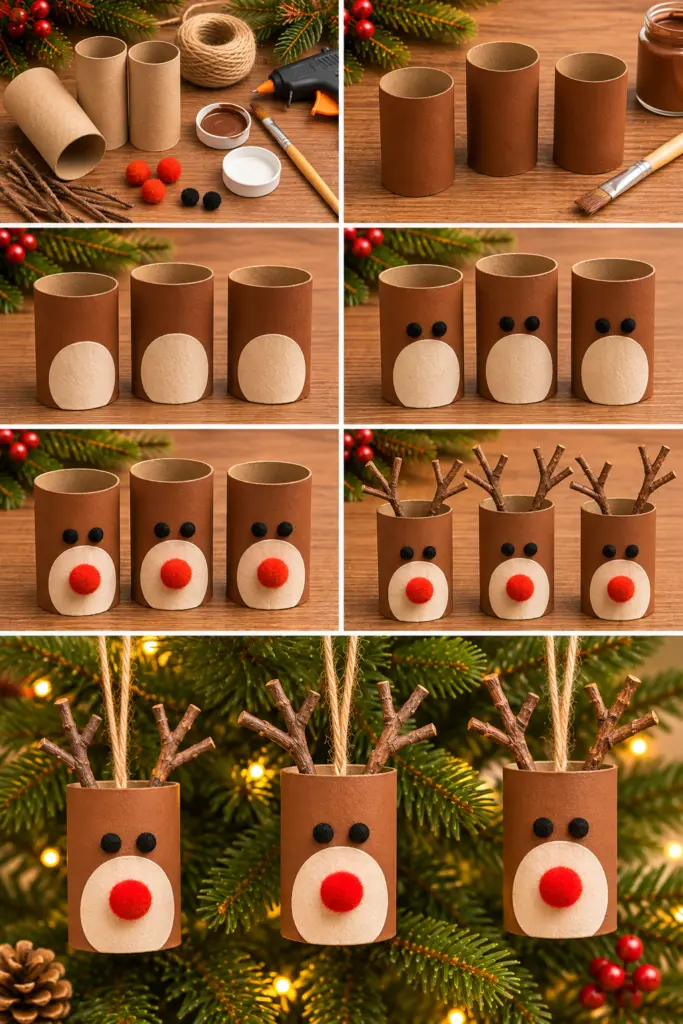
Cardboard Tube Reindeer Ornaments
Cardboard tube reindeer are adorable Christmas decorations that children will love making.
They’re easy to personalize and can be used as ornaments or small holiday decorations.
Materials:
- Cardboard tubes
- Brown paint
- White paint
- Red pom-poms
- Black pom-poms
- Twigs
- Twine
- Glue
How to make it:
- Cut cardboard tubes into smaller sections.
- Paint them brown.
- Add a white oval for the reindeer’s face.
- Attach black pom-poms for the eyes.
- Add a red pom-pom for the nose.
- Attach small twigs as antlers.
- Add a twine loop for hanging.
These little reindeer are perfect for a handmade Christmas tree.
Cardboard Tube Christmas Elves
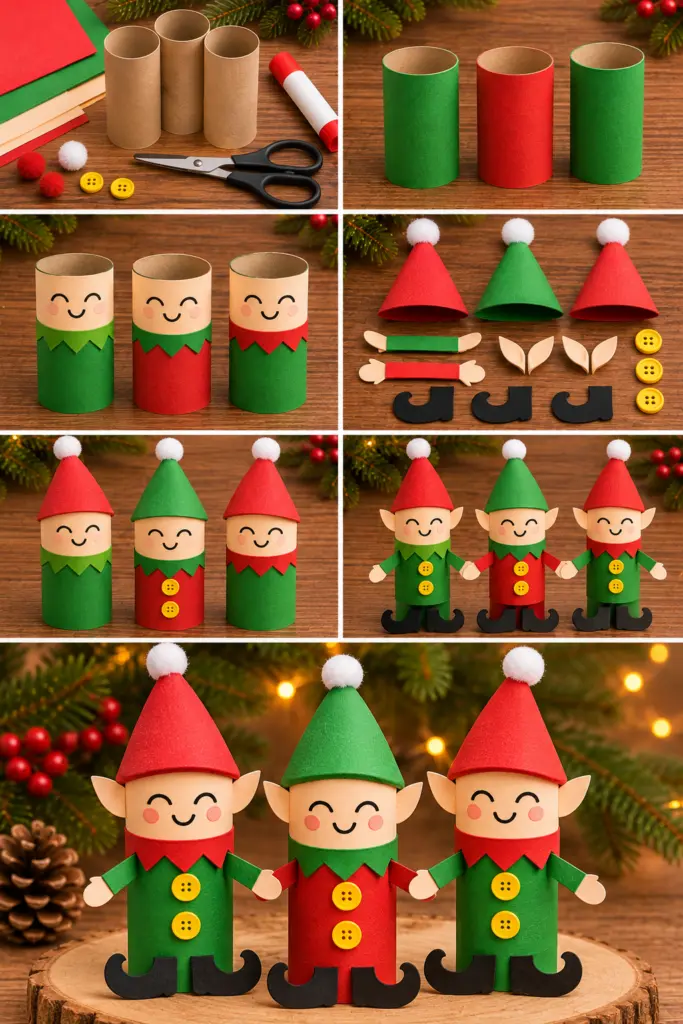
Christmas elves are another fun craft for children.
You can use cardboard tubes to create colorful elves with pointed hats, cheerful faces, and festive outfits.
Materials:
- Cardboard tubes
- Colored paper
- Glue
- Scissors
- Markers
- Pom-poms
How to make it:
- Cover a cardboard tube with colored paper.
- Draw a cheerful face.
- Create a pointed hat from paper.
- Add small paper arms and feet.
- Decorate the elf with pom-poms and buttons.
Make several elves in different colors and display them together.
Cardboard Snowman Gift Boxes
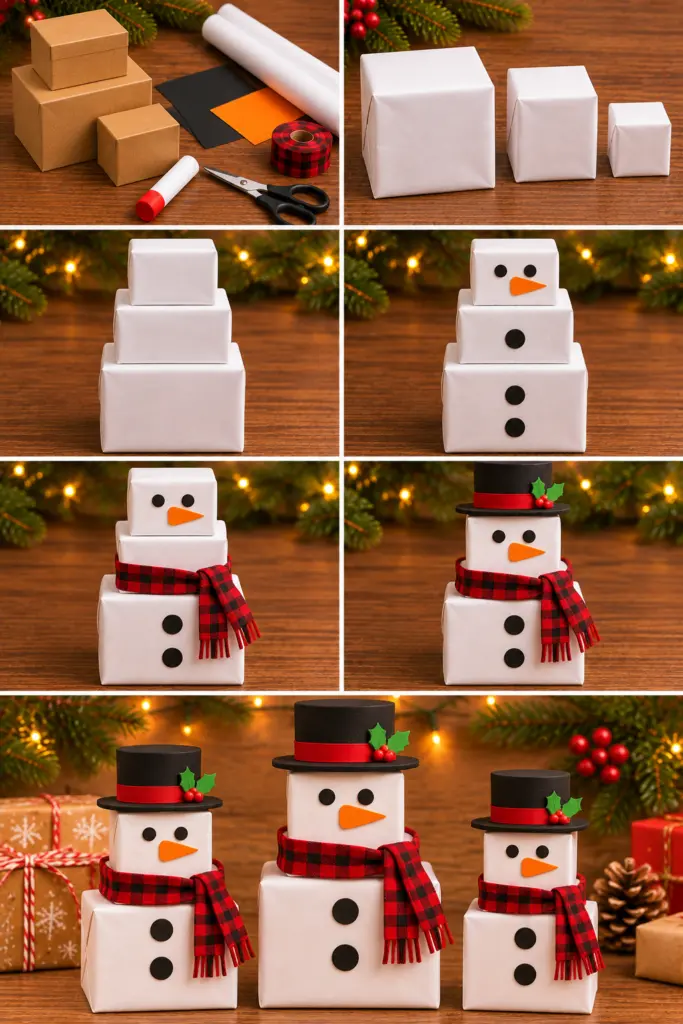
Turn ordinary cardboard boxes into adorable snowman decorations.
These are perfect for wrapping small gifts or creating a playful Christmas display.
Materials:
- Small cardboard boxes
- White paper
- Black paper
- Orange paper
- Ribbon
- Glue
How to make it:
- Wrap the boxes in white paper.
- Stack them from largest to smallest.
- Add black circles for the eyes and buttons.
- Create an orange paper nose.
- Add a ribbon scarf.
- Finish with a small hat.
These snowmen are especially cute when displayed beneath a Christmas tree.
Cardboard Christmas Tree Puzzle
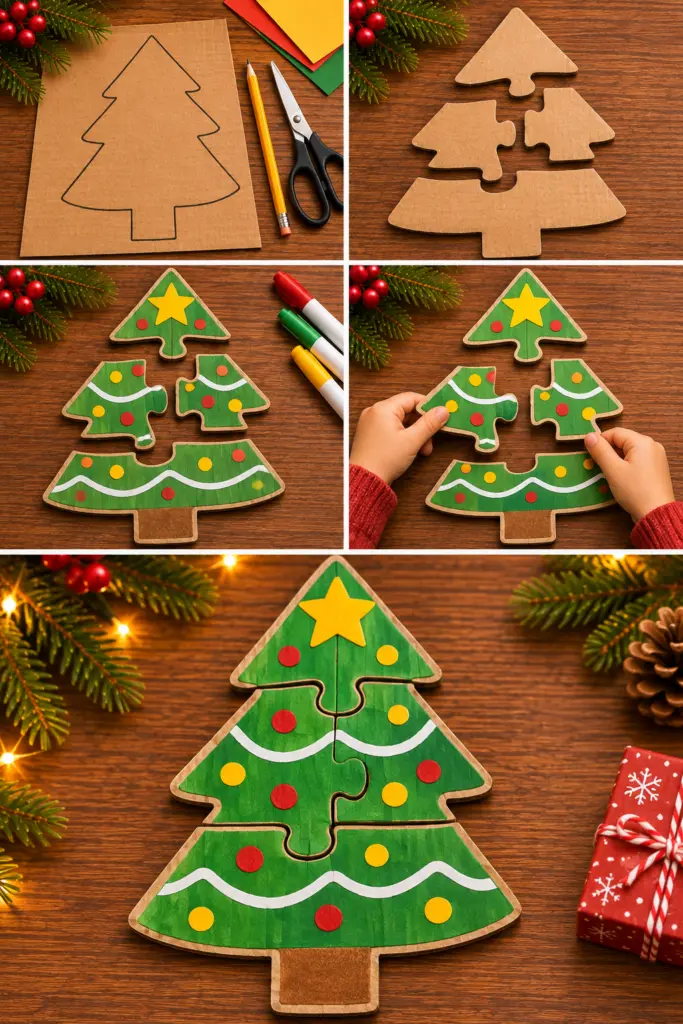
A cardboard Christmas tree puzzle is a fun activity for children.
It’s simple to make and can be decorated with colorful shapes.
Materials:
- Cardboard
- Pencil
- Scissors
- Markers
- Colored paper
How to make it:
- Draw a Christmas tree on cardboard.
- Cut the tree into several large puzzle pieces.
- Decorate the pieces with Christmas colors.
- Let the children assemble the puzzle.
For younger children, use fewer and larger pieces.
Cardboard Christmas House Playset
A cardboard Christmas house playset is a wonderful project for imaginative play.
Children can create their own little Christmas village with houses, trees, and tiny characters.
Materials:
- Cardboard boxes
- Scissors
- Glue
- Markers
- Colored paper
- Small toy figures
How to make it:
- Choose a cardboard box.
- Cut out windows and doors.
- Decorate the outside of the house.
- Create a cardboard roof.
- Make small trees and other decorations.
- Arrange everything into a miniature Christmas village.
Children can use the playset throughout the holiday season.
Large DIY Cardboard Christmas Tree
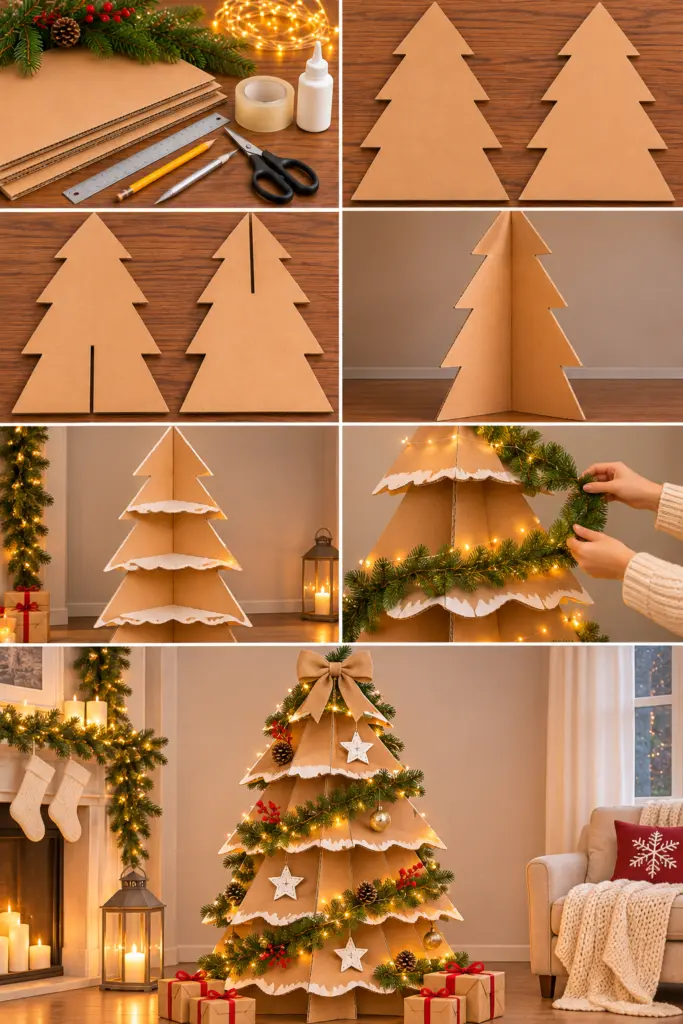
If you want a dramatic Christmas decoration, a large cardboard Christmas tree is an exciting project.
Inspired by the oversized cardboard tree designs in the reference images, this idea transforms large cardboard sheets into a festive statement piece.
Materials:
- Large cardboard sheets
- Pencil
- Ruler
- Craft knife
- Strong tape
- Glue
- Evergreen garland
- Battery-operated lights
How to make it:
- Draw a large triangular tree shape on cardboard.
- Cut out two matching panels.
- Create slots so the panels can fit together.
- Assemble the tree into a freestanding structure.
- Add cardboard shelves or decorative layers if desired.
- Wrap the structure with evergreen garland.
- Add battery-operated lights and Christmas decorations.
This project is ideal for creating a unique holiday display on a porch or in a spacious living room.
For a smaller version, use the same design to create a tabletop tree.
DIY Cardboard Christmas Tree with Festive Decorations
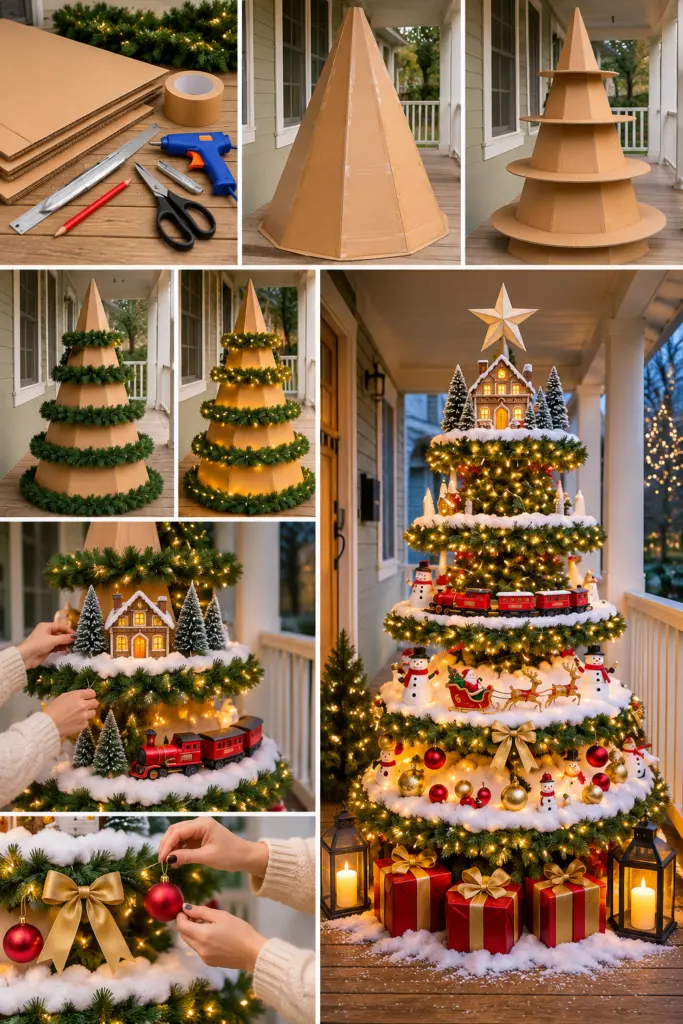
A large DIY cardboard Christmas tree is a creative way to make a statement with your holiday decor.
It’s perfect for decorating a covered porch, a spacious living room, or a festive outdoor display.
Materials:
- Large cardboard sheets or boxes
- Pencil and ruler
- Craft knife or scissors
- Strong tape
- Hot glue or craft glue
- Evergreen garland
- Battery-operated fairy lights
- Cotton batting or faux snow
- Christmas ornaments and ribbons
- Miniature houses, trees, or holiday figures
- Cardboard for circular tiers
How to make it:
- Create a large cone-shaped structure using cardboard sheets.
- Secure the edges with strong tape to create a stable base.
- Cut several circular cardboard platforms in different sizes.
- Make openings in the center of each platform so they fit around the tree structure.
- Slide the platforms onto the cardboard tree, arranging them from largest at the bottom to smallest at the top.
- Wrap the tree with evergreen garland, covering the cardboard structure.
- Add warm battery-operated fairy lights around each tier.
- Decorate the platforms with cotton batting or faux snow.
- Place miniature Christmas houses, tiny trees, snowmen, or a festive train on the different levels.
- Finish with colorful ornaments, elegant bows, and a beautiful star topper.
For an extra magical effect, place wrapped Christmas gifts around the base and add lanterns on either side. The combination of glowing lights, snowy details, and handmade decorations creates a stunning Christmas display.
Tip: If you’re displaying your cardboard Christmas tree outdoors, keep it in a covered, dry area. Cardboard can become weak when exposed to rain or moisture. Use battery-operated lights and secure the structure carefully to prevent it from tipping over.
Tips for Making Beautiful Cardboard Christmas Crafts Decorations
A few simple techniques can make your cardboard crafts look polished and last longer.
Choose the Right Cardboard
| Cardboard Type | Best Uses |
|---|---|
| Corrugated cardboard | Large trees, wreaths, and standing decorations |
| Cereal boxes | Ornaments, gift tags, and garlands |
| Shipping boxes | Christmas villages and large decorations |
| Cardboard tubes | Reindeer, elves, and small ornaments |
| Thin cardboard | Stars, snowflakes, and decorative shapes |
Thicker cardboard is best for projects that need to stand upright.
Use a Coordinated Color Palette
Try these beautiful Christmas combinations:
- Brown, white, and green for rustic decor.
- White, silver, and gold for a winter wonderland.
- Red, green, and white for traditional Christmas.
- Beige, cream, and natural wood for minimalist decor.
Add Natural Materials
Cardboard looks beautiful with pinecones, evergreen branches, twine, dried orange slices, wooden beads, and natural ribbon.
These details create a warm, handmade appearance.
Make Your Decorations Last
Follow these simple tips:
- Keep cardboard away from moisture.
- Use strong glue for structural projects.
- Store decorations in a dry box.
- Keep cardboard away from real candles.
- Use battery-operated lights.
When crafting with children, adults should handle sharp tools and hot glue guns.
FAQs
How do you make a cardboard Christmas village?
Cut cardboard into house shapes, assemble the walls and roofs, and decorate them with white paint to resemble snow and icing. Arrange the houses together and add battery-operated lights for a magical display.
Can cardboard Christmas decorations be reused?
Yes! Store them in a dry place and protect them from moisture. Decorations made from sturdy corrugated cardboard can often be reused for several Christmas seasons.
What can I make with cardboard for Christmas?
You can make Christmas trees, gingerbread houses, reindeer ornaments, stars, snowflakes, wreaths, gift tags, garlands, and miniature Christmas villages. Cardboard is versatile enough for both small decorations and large statement pieces.
What is the easiest cardboard Christmas craft?
Cardboard Christmas gift tags and star ornaments are among the easiest projects. They require only a few materials, simple cutting, and basic decorating techniques.
These 21 beautiful DIY cardboard Christmas crafts prove that you don’t need expensive materials to create a magical holiday home.
From rustic cardboard Christmas trees and charming gingerbread houses to handmade stars and adorable reindeer, there’s something for everyone to enjoy.
The best part is that many of these projects use materials you already have at home. So, before throwing away your next cardboard box, think about what you could create with it!
And for more DIY Crafts ideas see our 17+ DIY Christmas Crafts with Felt Ideas, 5-Minute Dollar Store Christmas Crafts Decorations, 35+ Easy Cheap Christmas Crafts to Make This November.
Happy crafting!