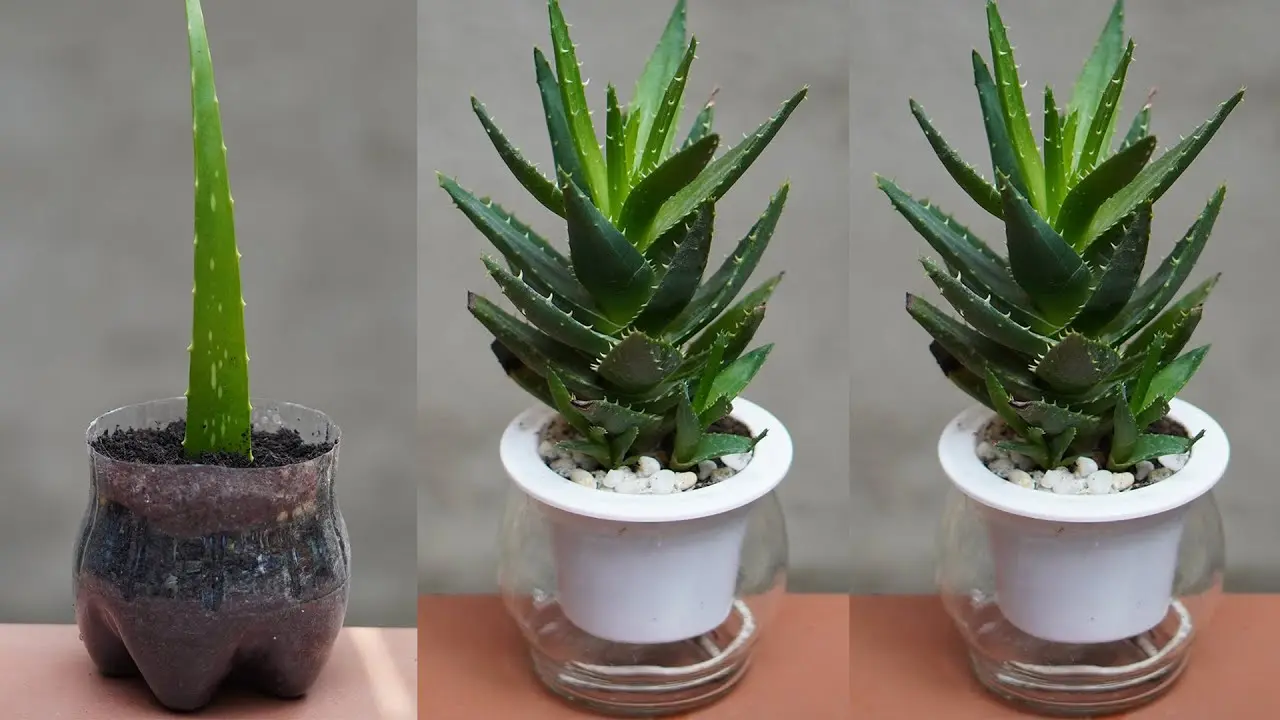
So, you’ve decided to delve into the fascinating world of propagating aloe vera plants:, eh? Well, buckle up, green thumb warriors, because we’re about to embark on an adventure that involves dirt, sun, and a dash of magic. In this complete guide, we’ll unravel the mysteries of nurturing those succulent wonders, from the tiniest pups to flourishing aloe kingdoms!
Table Of Contents
Aloe Plant Propagation 101
Before we dive into the nitty-gritty, let’s have a quick chat about what Aloe plants are and why they’re the rockstars of the succulent world.
What’s the Hype with Aloe Plants?
Aloe plants aren’t just your run-of-the-mill succulents; they’re like the superheroes of the plant kingdom. These fleshy wonders are known for their magical healing properties, turning sunburns into distant memories and soothing the skin with their gel-filled leaves. But beyond their medicinal prowess, Aloe plants are low-maintenance companions that can thrive in various environments, making them perfect for both seasoned gardeners and plant newbies.
Why Propagating Aloe Vera Plants?
Now, you might be wondering, why bother with all this propagation jazz? Well, my friend, propagating Aloe plants is like creating a botanical family reunion – you get to spread the Aloe love, share the green joy, and have more of these delightful plants around your home. Plus, it’s a budget-friendly way to expand your Aloe empire without breaking the bank.

Growing Aloe Plants from Seeds: Propagating Aloe Vera Plants
Alright, let’s kick things off with the OG method – growing Aloe plants from seeds. It’s like starting a plant family from scratch!
Step 1: Gather Your Arsenal
- Well-draining potting mix
- Small pots or seed trays
- A dash of patience
Step 2: Harvesting the Seeds
Wait until the seed pods are dry before removing and opening them to harvest the seeds. Place a paper bag or tray under the pods to catch the seeds when they are released.
Step 3: Planting the Seeds
Fill pots or seed-starting trays with a premoistened succulent mix and press the aloe seeds into the soil’s top.
Step 4: The Soil Saga
Your Aloe seeds are picky about their living conditions. Give them a cozy home interior by using well-draining potting mix. Say no to soggy situations – Aloe plants hate wet feet!
Step 5: Sow the Seeds
Now, let’s get down and dirty – sprinkle those Aloe seeds on the soil surface. Don’t bury them too deep; they like a bit of sunshine on their backs!
Step 6: Providing Light and Water
Place the pots or trays in a bright window or under a grow light, keeping the soil consistently moist. Aloe seeds need at least eight hours of bright light daily to germinate. Sprouting should occur in two to four weeks. Afterward, reduce watering to every 10 to 14 days.
Step 7: Patience, Patience, Patience
Growing Aloe plants from seeds is a waiting game. Be patient; let nature do its thing. In a few weeks, you’ll have tiny Aloe sprouts saying hello to the world!
Step 4: Repotting Aloe Seedlings
Once the new aloes are a few inches tall, repot them into individual pots, providing the same care as for mature aloe plants.

Propagating Aloe Vera Plants from Pups
Now, let’s talk about making Aloe babies – propagating from pups! It’s like Aloe parenthood, but without the sleepless nights.
Step 1: Spot the Pups
Aloe plants are generous parents, They produce miniature versions of the parent plant, around their roots. To ensure successful propagation, select pups that are at least 3–4 inches tall and have several sets of leaves. This ensures the pups are mature enough to thrive independently.
Step 2: Get the Right Tools
You don’t need a fancy toolkit for this one – just grab a garden shears or sharp dull knife to gently loosen the plant roots. This step is crucial to avoid damage to the parent plant and facilitate the separation of pups. Safety first, folks!
Step 3: Say Hello to Separation
Carefully separate the pup from the parent, ensuring you get some roots with it. Think of it as giving your kid a little independence – roots are like their passport to the big, green world.
Step 4: Separating the Pups
Once the aloe plant is removed, gently separate the pups. For rooted pups, use your fingers to free them, while pups without roots require a clean knife. Repot the parent plant and provide special care for pups without roots to encourage callus formation, preventing future rot.
Step 5: Potting Up Those Pups
Select a small pot with proper drainage and use well-draining succulent potting mix. Plant the aloe pup at the soil line, firm the soil, and add a layer of pebbles to prevent toppling. Use well-draining soil. Wait for seven to 10 days before watering to prevent rot. Subsequently, care for the new aloes as you would for a mature aloe plant.
Step 5: Watch ‘Em Grow
Now, it’s time to play the waiting game again. Watch your Aloe pups grow into independent, thriving plants. It’s like witnessing a mini-miracle in your garden!
Propagating Aloe Vera Plants from Stem Cuttings
If you’re feeling a bit more adventurous, let’s talk about propagating Aloe plants from stem cuttings. It’s like plant surgery but way less stressful!
Step 1: Cutting Off the Parent Plant
Use a sharp, clean knife to cut the aloe plant at the base, just above the soil line. This seemingly drastic step is necessary for harvesting leaves with attached stems. Place the pot back in a sunny spot and care for it as usual.
Step 2: Removing Lower Leaves
Carefully peel away the bottom two or three leaves from the stem. These lower leaves usually lack enough attached stem to root and should be composted.
Step 3: Harvesting Stem and Leaf Cuttings
Select a healthy aloe leaf and score the stem with two vertical cuts just below the leaf using a sharp knife. Slowly pull the leaf and stem section away from the plant.
Step 4: Dry it Out
Let your stem cutting bask in the sun for a day or two. It’s like giving it a little vacation before its big debut.
Step 5: Planting Time
Stick that dried-out stem into well-draining soil in a warm, bright spot. Pups should sprout in one to two weeks. Don’t bury it too deep; we’re going for a stylish, above-ground look here!
Step 6: Water Wisely
Water your stem cutting sparingly. Aloe plants aren’t fans of waterlogged conditions, so keep it on the dry side. After one or two months, plant the new pups in soil and care for them like mature aloe plants.

And there you have it – the ultimate guide on how to propagate aloe vera plants! Armed with your trusty knife, a bit of sunshine, and a sprinkle of patience, you’ll soon have aloe offspring worthy of botanical admiration. Remember, propagating aloe plants is a rewarding endeavor. Whether you choose pups, stem cuttings, or seeds, following these detailed steps will ensure successful propagation, leading to a flourishing collection of aloe plants in your home or garden.
FAQs
Can you grow aloe vera from a cutting?
Yes, you can grow aloe vera from a cutting. Aloe vera is commonly propagated by removing offsets (pups) that grow at the base of the mature plant, but you can also propagate it from leaf cuttings.
Should I propagate aloe in water or soil?
Aloe vera cuttings generally root more successfully in soil rather than water. While it’s possible to propagate aloe vera in water, this method can lead to weaker roots, making the plant more susceptible to issues when transferred to soil. Planting directly in well-draining soil is usually recommended.
How do you propagate a broken aloe vera plant?
If your aloe vera plant has a broken leaf or stem:
- Allow the cut or broken end to dry and callus for a day or two.
- Plant the broken part in well-draining soil, burying the cut end.
- Water sparingly and place the plant in bright, indirect light.
- The broken part can potentially root and grow into a new plant.
How often do you water aloe vera cuttings?
Water aloe vera cuttings sparingly. Allow the soil to dry out between waterings. Typically, you might water every 2-3 weeks, but the frequency can vary based on factors like temperature, humidity, and the size of the pot. Overwatering can lead to root rot, so it’s essential to ensure proper drainage.
Will aloe cuttings root in water?
Aloe vera cuttings can root in water, but it’s generally not the recommended method. Roots formed in water may be weaker compared to those grown in soil. If you choose to root aloe cuttings in water, transfer them to soil once roots have developed to encourage stronger growth.
Can you replant aloe vera without roots?
Yes, you can replant aloe vera without roots, but it may require special care. Follow these steps:
- Allow the cut end of the aloe cutting to dry and callus for a day or two.
- Plant the cutting in well-draining soil, burying the cut end.
- Water sparingly and place the plant in bright, indirect light.
- Be patient, as the cutting may develop roots over time.
