Looking for creative ways to decorate your home for Christmas without spending a fortune? These scrap wood Christmas projects are a wonderful way to turn leftover lumber, old wooden boards, and unused timber into beautiful holiday decorations.
From rustic wooden Christmas trees and charming snowmen to handmade ornaments and farmhouse signs, there’s something here for every crafting style. Best of all, many of these ideas require only a few basic supplies and a little imagination.
Whether you love farmhouse Christmas decor, minimalist Scandinavian designs, or cozy rustic decorations, these DIY projects will help you create a festive home while giving leftover wood a second life.
Table of Contents
17 Easy DIY Scrap Wood Christmas Projects
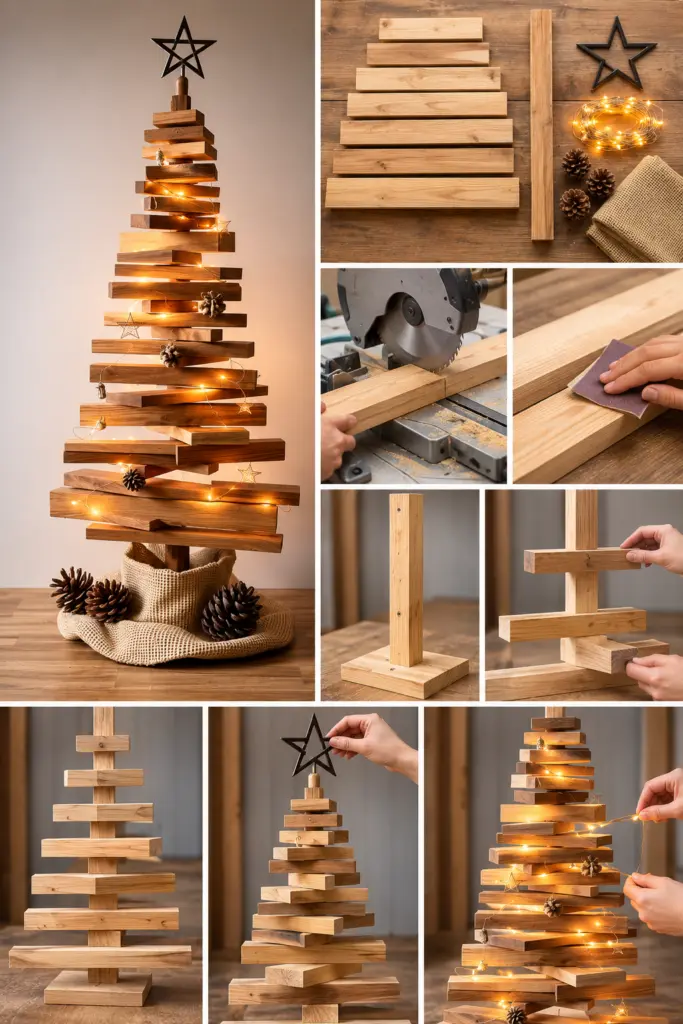
1. Rustic Stacked Scrap Wood Christmas Tree
This stacked wooden Christmas tree is a beautiful way to use leftover timber pieces of different lengths. Its uneven branches create a charming handmade appearance that looks wonderful in farmhouse and rustic interiors.
Materials:
- Wooden offcuts in different lengths
- One wooden support post
- Wood glue or screws
- Sandpaper
- Warm white fairy lights
- Small star decoration
- Pinecones and burlap fabric
How to make it:
- Cut several wooden pieces into gradually shorter lengths.
- Sand the edges to remove splinters.
- Arrange the pieces horizontally around a central wooden support, starting with the longest pieces at the bottom.
- Secure each piece with screws or suitable wood glue.
- Add a wooden or metal star to the top.
- Finish with fairy lights, pinecones, and a burlap-wrapped base.
Styling tip: Leave the wood in its natural color for a warm Scandinavian-inspired Christmas look.
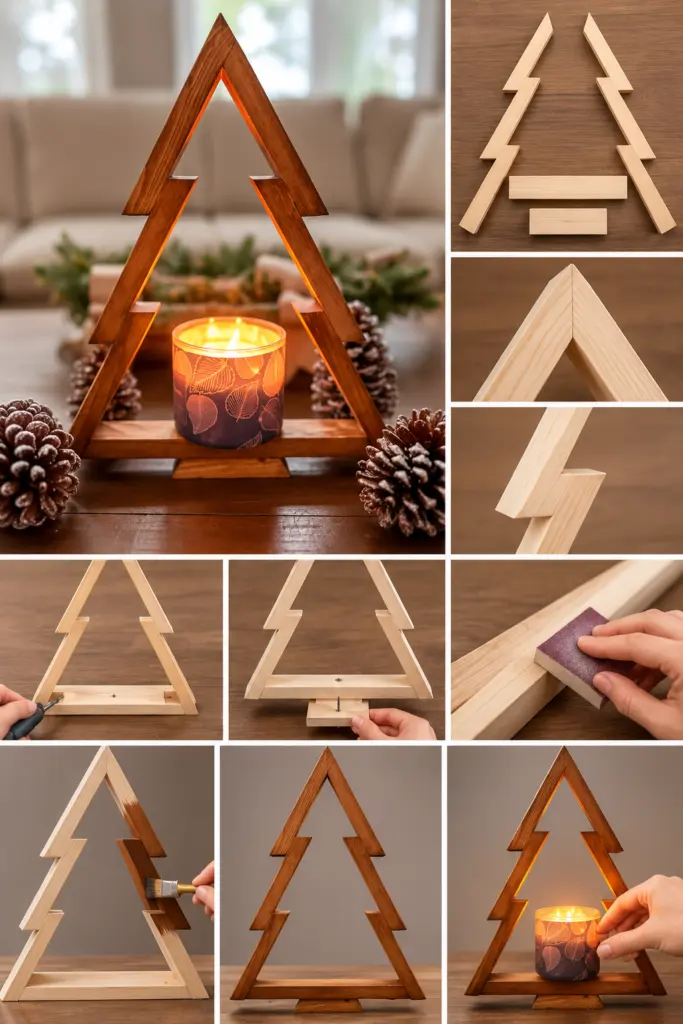
2. Wooden Christmas Tree Candle Holder
If you love simple Christmas decorations, this wooden triangular candle holder is a lovely addition to your holiday table. Its geometric tree shape gives it a modern appearance while the natural wood adds warmth.
Materials:
- Two long pieces of scrap wood
- One short wooden base
- Wood glue and screws
- Wood stain
- Sandpaper
- Battery-operated LED candle
How to make it:
- Cut two wooden strips to create a triangular tree outline.
- Join the strips securely at the top.
- Attach a horizontal wooden piece at the bottom.
- Add a stable base underneath.
- Sand and stain the wood.
- Place a battery-operated LED candle in the center.
Styling tip: Surround your candle holder with pinecones and evergreen branches for a cozy Christmas centerpiece. Avoid placing an open flame inside or directly beside a wooden structure.
3. Painted Green Scrap Wood Christmas Tree
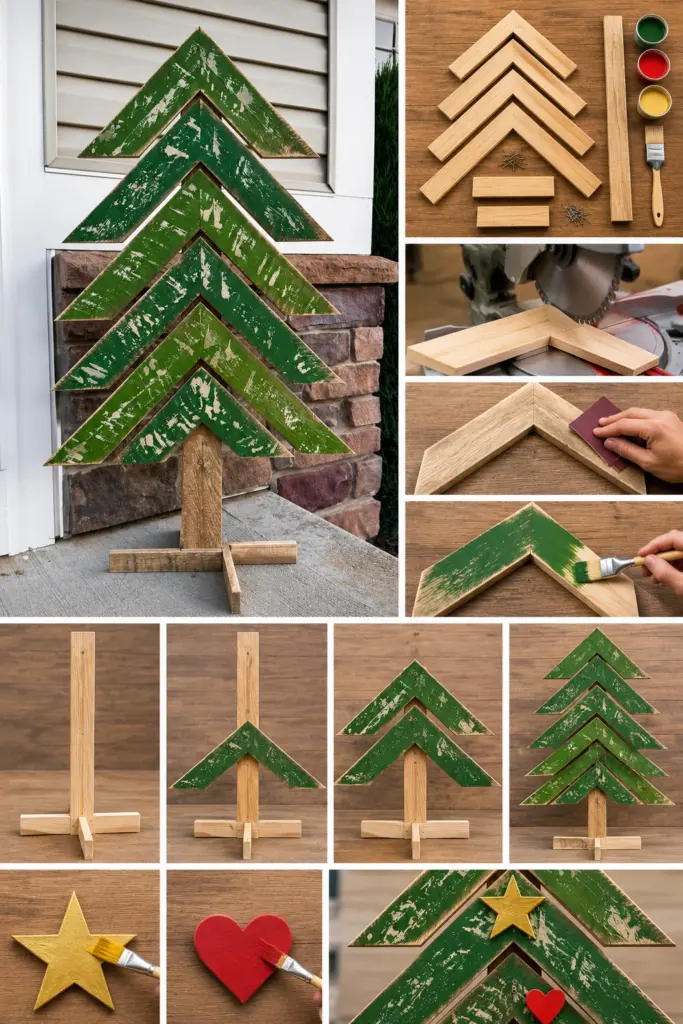
Bring a little color into your Christmas decorations with this creative green wooden tree. Instead of traditional branches, it uses angled wooden boards attached to a central support.
Materials:
- Scrap wooden boards
- One vertical wooden post
- Green acrylic paint
- Red and gold paint
- Wood glue or screws
- Wooden base
How to make it:
- Cut wooden boards into different lengths.
- Paint them in a beautiful forest-green shade.
- Attach the boards at different angles to create a Christmas tree silhouette.
- Secure the central post to a wooden base.
- Add a golden star at the top and a small red heart.
- Let everything dry before displaying.
Styling tip: Try sage green, olive green, or muted forest green for a charming farmhouse finish.
4. Rustic Merry and Bright Wooden Christmas Sign
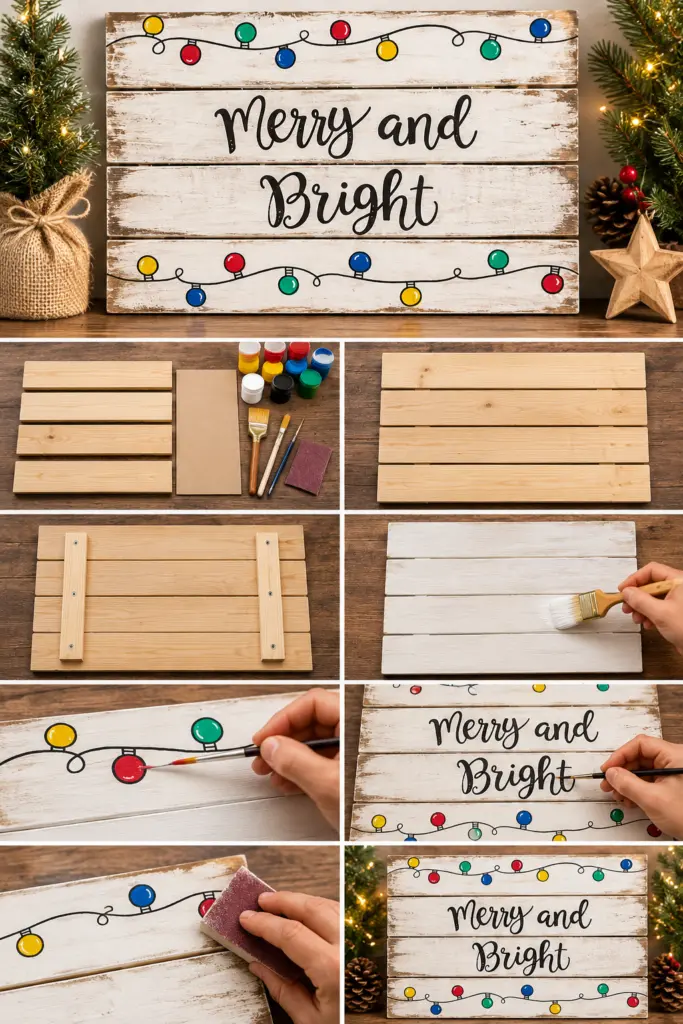
A handmade Christmas sign is an easy way to add a personal touch to your home. With a few leftover boards, you can create a decorative piece for your mantel, entryway, or Christmas shelf.
Materials:
- Four small pieces of scrap wood
- One thin wooden board
- White paint
- Gold paint or lettering stencil
- Wood glue
- Sandpaper
How to make it:
- Cut the wood into a rectangular frame.
- Assemble the frame around a flat wooden backing.
- Paint the backing in an off-white or cream shade.
- Write “Merry & Bright” using a stencil or paint pen.
- Lightly sand the frame for a distressed farmhouse finish.
Styling tip: Pair it with greenery, pinecones, and neutral Christmas ornaments.
5. Handmade Wooden Cardinal Ornament
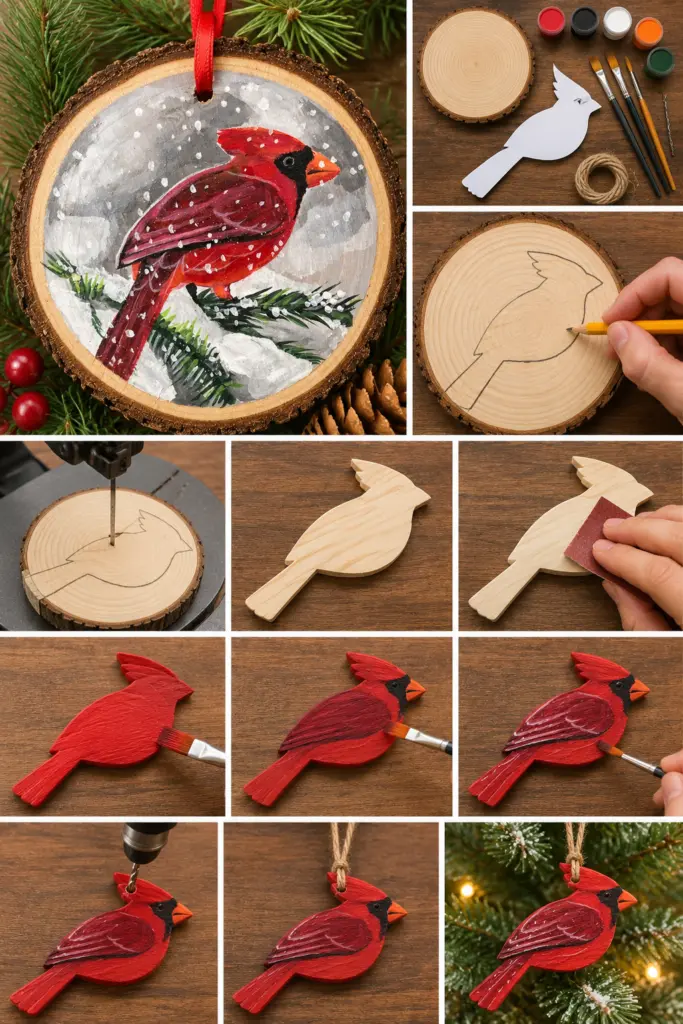
Small wooden ornaments are perfect for using those leftover pieces that are too small for larger projects. A red cardinal ornament is especially pretty against green Christmas tree branches.
Materials:
- Thin scrap wood
- Cardinal bird template
- Red, black, and brown acrylic paint
- Jigsaw or scroll saw
- Small drill
- Twine
How to make it:
- Draw a simple bird silhouette on the wood.
- Carefully cut around the outline.
- Sand the edges until smooth.
- Paint the bird red and add the wing and facial details.
- Drill a small hole near the top.
- Thread twine through the hole to hang it.
Styling tip: Make several birds in different sizes for a coordinated handmade ornament collection.
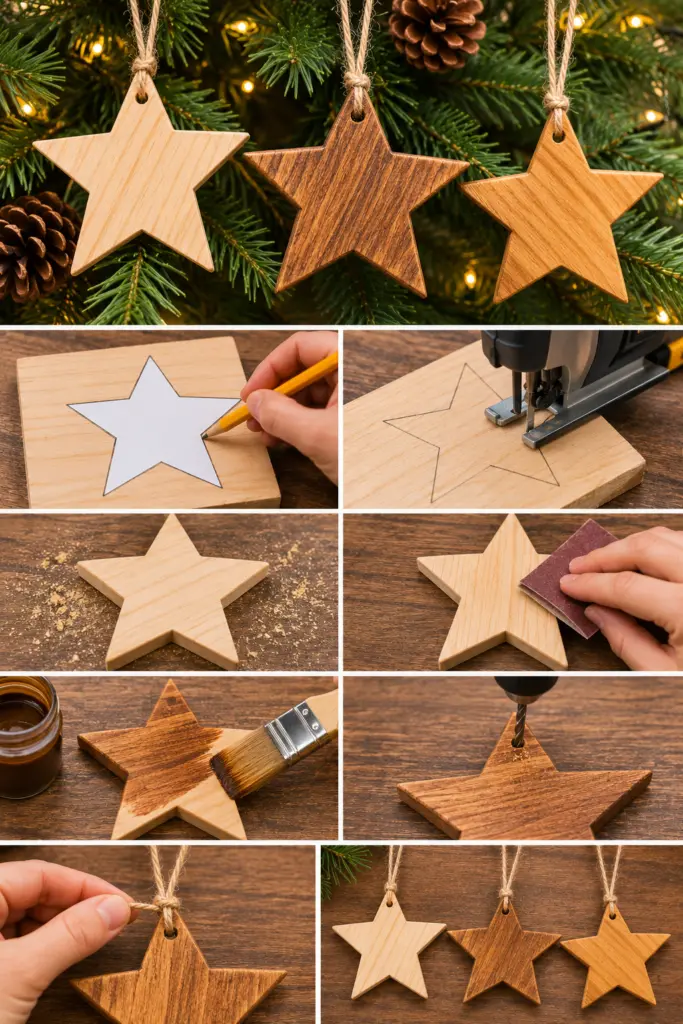
6. Rustic Wooden Star Ornaments
Wooden stars are timeless Christmas decorations that look beautiful on Christmas trees, wreaths, and gift packages.
Materials:
- Thin scrap wood
- Star-shaped template
- Jigsaw
- Sandpaper
- Small drill
- Twine or ribbon
How to make it:
- Trace a star shape onto your wooden piece.
- Cut carefully around the outline.
- Sand the edges and surface.
- Leave the wood natural or apply a light stain.
- Drill a small hanging hole.
- Add twine or ribbon.
Styling tip: Mix different wood shades to create a natural, collected look.
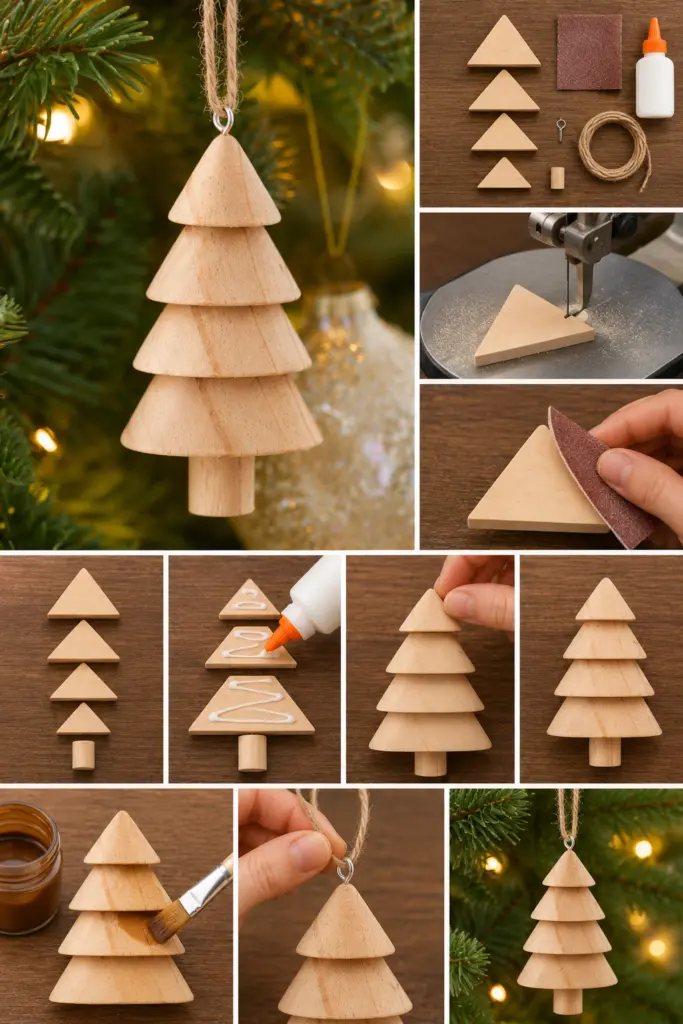
7. Mini Layered Wooden Christmas Tree Ornament
These miniature wooden trees are ideal for decorating a Christmas tree or adding to a festive garland. Their layered triangular shapes create a simple yet attractive design.
Materials:
- Thin wooden offcuts
- Wood glue
- Small wooden base
- Sandpaper
- Twine
How to make it:
- Cut several small triangular wooden pieces.
- Arrange them from largest to smallest.
- Glue the pieces together to create a layered tree.
- Attach a small wooden base.
- Sand and finish with natural wood stain.
- Add a hanging loop if you’d like to use it as an ornament.
And for more Christmas Tree ideas explore our Amazing DIY Dollar Tree Christmas Decorations To Try This Year!
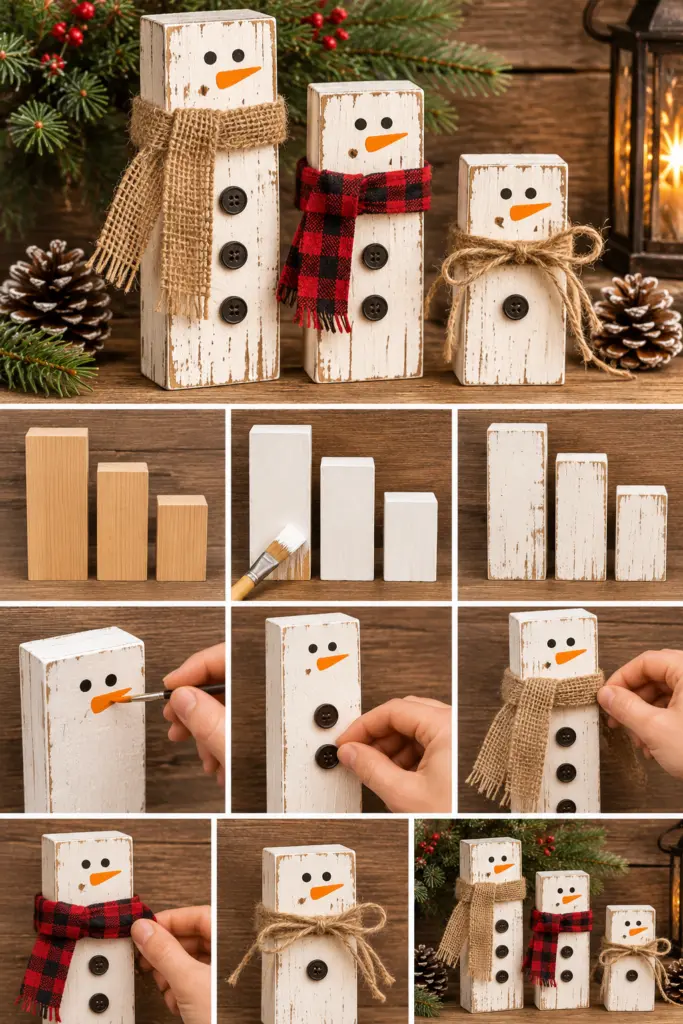
8. Rustic Scrap Wood Snowmen
These adorable wooden snowmen are among the easiest scrap wood Christmas projects to make. They’re especially suitable for decorating shelves, fireplaces, and farmhouse-style Christmas displays.
Materials:
- Wooden blocks in different sizes
- White paint
- Black buttons
- Orange paint
- Burlap or fabric scraps
- Twine
How to make it:
- Cut three wooden blocks into different heights.
- Paint them white and allow them to dry.
- Add black eyes and buttons.
- Paint a small orange carrot-shaped nose.
- Wrap fabric or burlap around each snowman’s neck.
- Display them together as a little snowman family.
Styling tip: Use distressed white paint and natural fabrics for a vintage winter appearance.
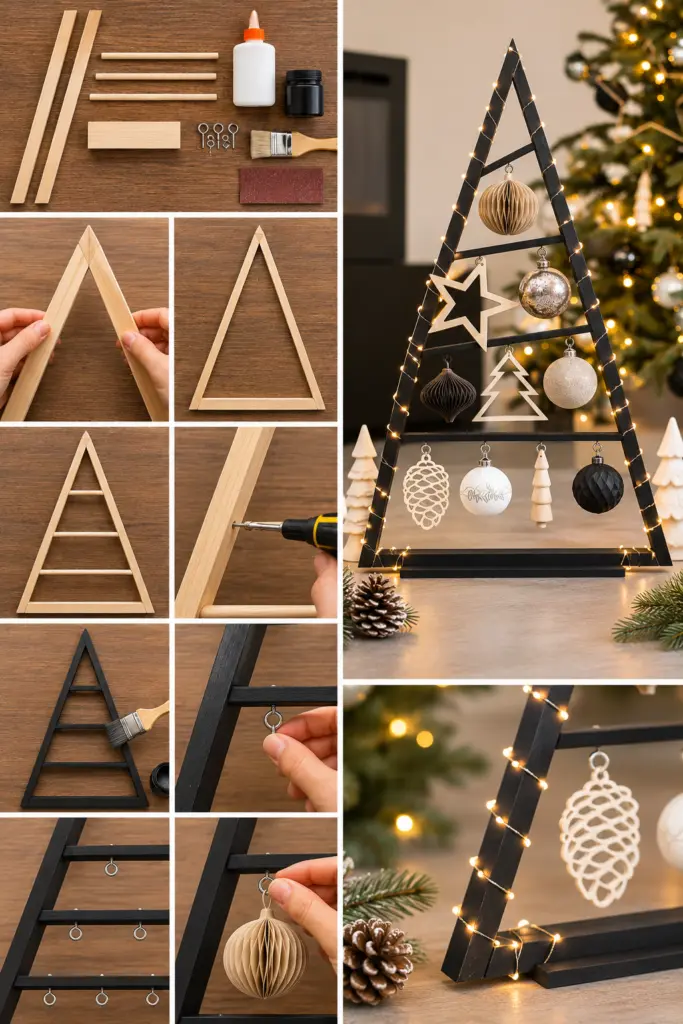
9. Modern Black Wooden Christmas Tree Display
For a more modern Christmas decoration, try making a black triangular wooden tree. Its open design creates a stylish display for small ornaments.
Materials:
- Thin wooden strips
- Black paint
- Small wooden dowels or hooks
- Wood glue
- Wooden base
- Mini wooden ornaments
How to make it:
- Cut two wooden strips to form a large triangle.
- Join the top and bottom securely.
- Add small horizontal bars inside the frame.
- Paint the entire structure matte black.
- Hang miniature wooden ornaments from the bars.
Styling tip: Display it on a mantel or console table with small white Christmas trees on either side.
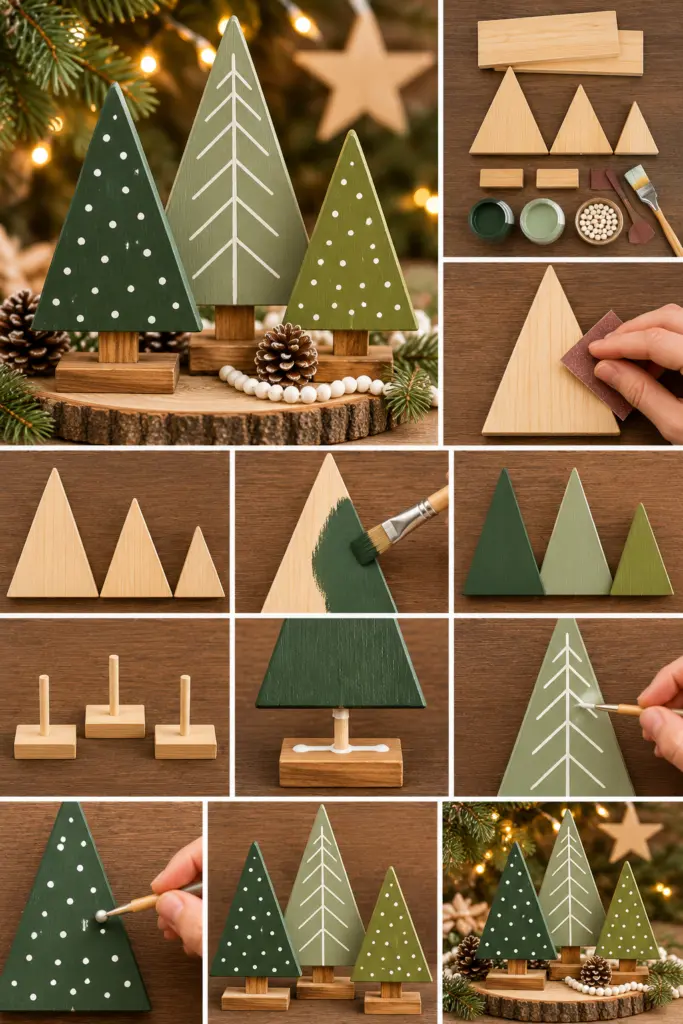
10. Mini Green Wooden Christmas Trees
Create a charming winter forest using three simple wooden trees. This project is ideal for small wood pieces and leftover boards.
Materials:
- Scrap wooden boards
- Green paint
- Small wooden bases
- Sandpaper
- White decorative beads
- Pinecones
How to make it:
- Cut three triangular tree shapes in different sizes.
- Sand their surfaces and edges.
- Paint them in different shades of green.
- Attach each tree to a wooden base.
- Add small decorative dots or simple engraved details.
- Arrange them together with pinecones and white beads.
Styling tip: Choose muted green tones for a peaceful Scandinavian-inspired display.
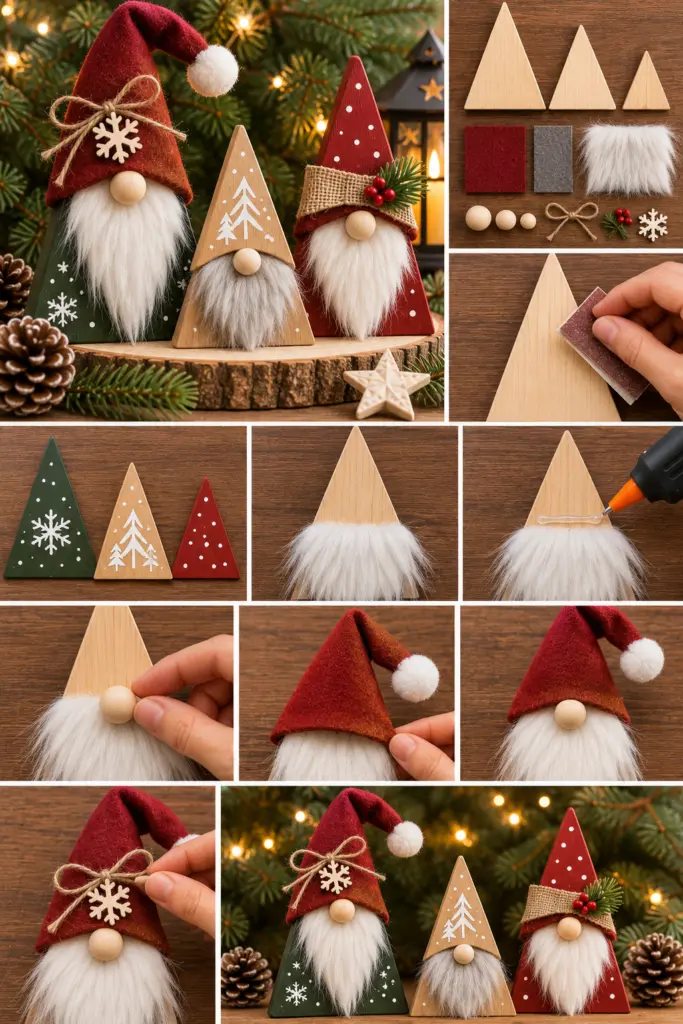
11. Whimsical Wooden Christmas Gnomes
Christmas gnomes are a fun way to add personality to your holiday decorations. With triangular wood scraps, soft fabric, and a little creativity, you can make an adorable collection.
Materials:
- Triangular wooden pieces
- Acrylic paint
- Faux fur
- Small wooden beads
- Felt or fabric
- Hot glue
How to make it:
- Cut wooden pieces into triangular shapes.
- Paint each piece in your favorite Christmas colors.
- Attach faux fur to create a fluffy beard.
- Add a wooden bead for the nose.
- Finish with a small fabric hat or leave the wooden triangle exposed as the hat.
- Arrange your gnomes in different sizes.
Styling tip: Combine gray, forest green, muted blue, and natural wood for a rustic winter palette.
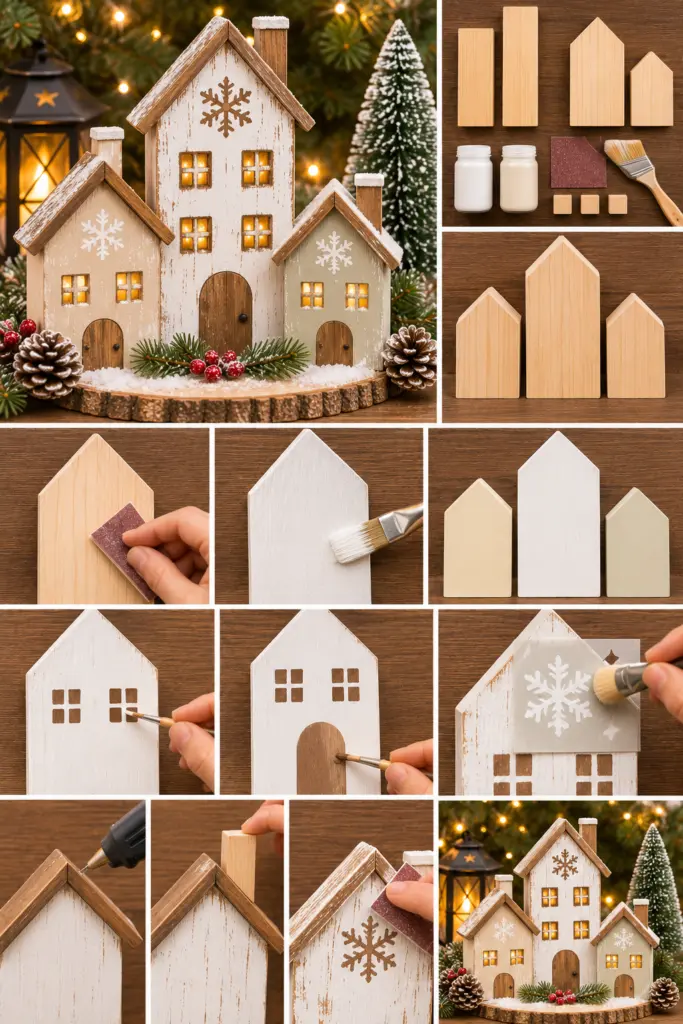
12. Farmhouse Wooden Christmas Houses
These charming wooden houses are perfect for creating a cozy Christmas village. Their simple shapes make them easy to customize with different paint colors and finishes.
Materials:
- Scrap wood blocks or boards
- White and cream paint
- Sandpaper
- Small wooden pieces for chimneys
- Wood glue
- Optional snowflake stencils
How to make it:
- Cut three or more wooden pieces into house shapes.
- Create triangular rooflines.
- Sand the surfaces.
- Paint them in cream, white, or soft beige.
- Add decorative snowflakes or distressed details.
- Attach small wooden chimneys.
- Arrange the houses together on a wooden tray.
Styling tip: Add a small artificial Christmas tree beside your wooden village to complete the display.
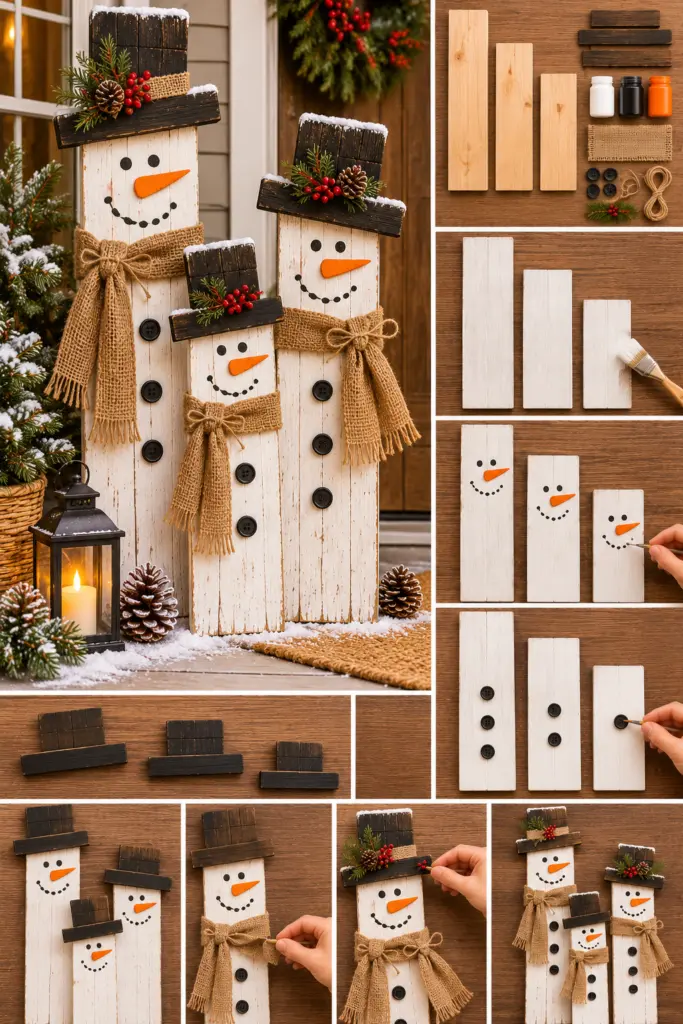
13. DIY Wooden Snowman Porch Decoration
If you have leftover pallet boards, turn them into a cheerful snowman family. This decoration looks particularly lovely in a rustic entryway or covered porch.
Materials:
- Reclaimed wooden boards
- White paint
- Black buttons
- Black paint
- Orange paint
- Burlap fabric
- Rope or twine
How to make it:
- Cut boards into different lengths.
- Sand the surfaces carefully.
- Paint the boards white, leaving some natural wood visible if desired.
- Add snowman faces and buttons.
- Create scarves using burlap or leftover fabric.
- Attach the finished pieces to a sturdy backing if making a group display.
Styling tip: Place the snowmen near evergreen branches and lanterns for a welcoming Christmas porch.
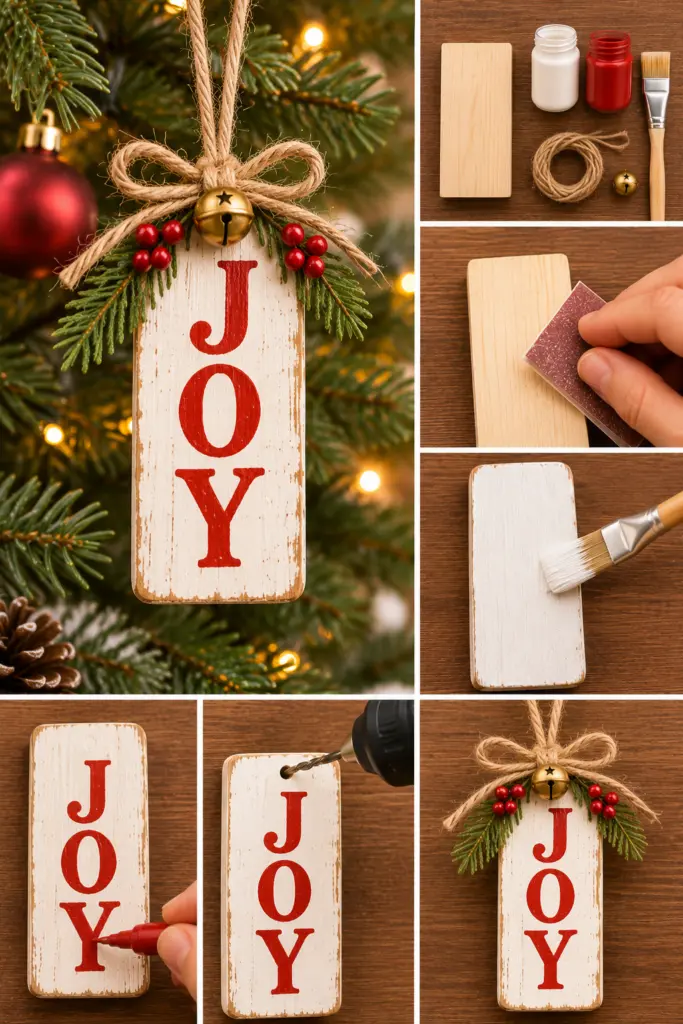
14. Simple Wooden JOY Christmas Ornament
Sometimes the simplest decorations are the most beautiful. A small wooden ornament with the word “JOY” makes a lovely addition to your Christmas tree.
Materials:
- Small rectangular wooden offcut
- White paint
- Red paint pen
- Twine
- Small bell
- Drill
How to make it:
- Cut a small rectangular piece of wood.
- Sand the edges.
- Paint it white or cream.
- Write “JOY” vertically using red paint.
- Drill a small hole near the top.
- Add twine and a decorative bell.
Styling tip: Make several ornaments with words like “LOVE,” “HAPPY,” and “PEACE” for a coordinated collection.
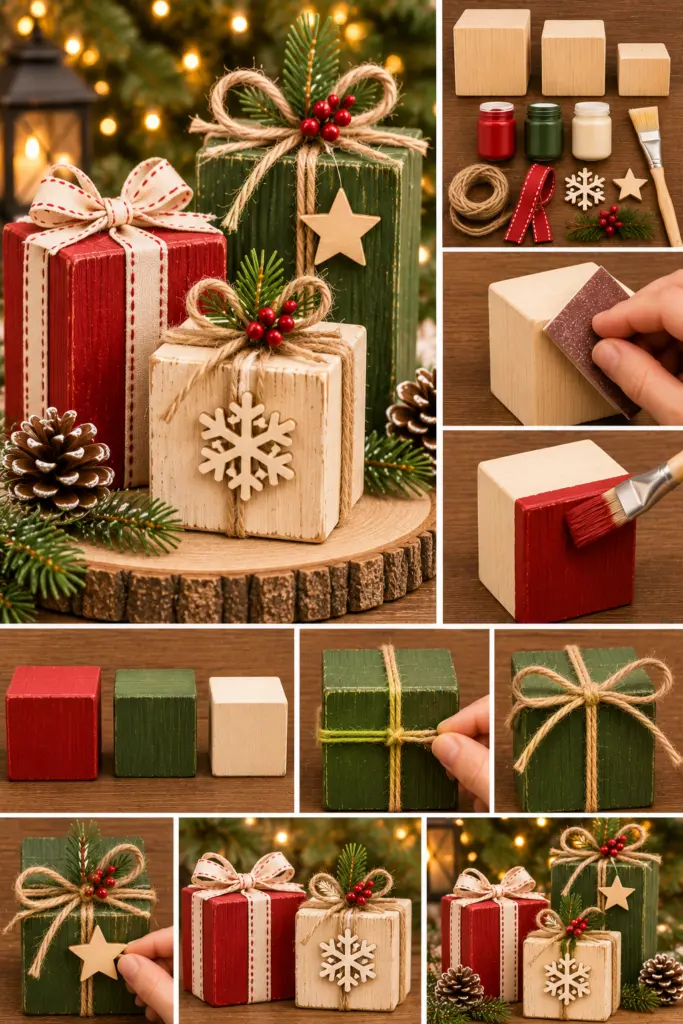
15. Rustic Wooden Christmas Gift Blocks
Turn leftover square wooden pieces into miniature Christmas presents. These decorative blocks are incredibly versatile and can be displayed on shelves, under your Christmas tree, or on a festive tray.
Materials:
- Small wooden blocks
- Red, green, and cream paint
- Ribbon
- Twine
- Wood stain
- Small decorative embellishments
How to make it:
- Sand the wooden blocks.
- Paint them in different Christmas colors.
- Allow the paint to dry.
- Wrap each block with ribbon or twine.
- Add small bows or decorative stars.
- Arrange them in groups of three or four.
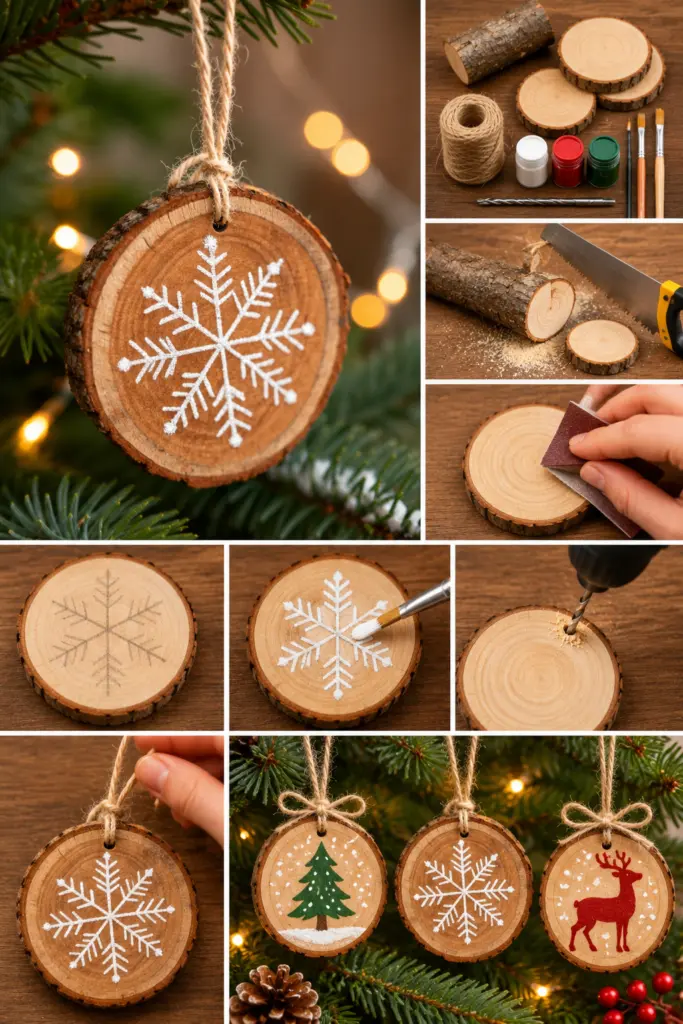
16. Natural Wood Slice Christmas Ornaments
If you have leftover untreated branches, wood slices can become beautiful natural Christmas ornaments. Each piece has a slightly different grain pattern, making every decoration unique.
Materials:
- Dry untreated wood branches
- Small saw
- Sandpaper
- Drill
- Twine
- Acrylic paint or paint pens
How to make it:
- Cut the branch into thin slices.
- Sand both sides until smooth.
- Draw stars, snowflakes, or Christmas trees.
- Paint simple designs or leave the slices natural.
- Drill a small hole near the edge.
- Thread twine through each ornament.
Styling tip: These ornaments also make lovely handmade gift tags.
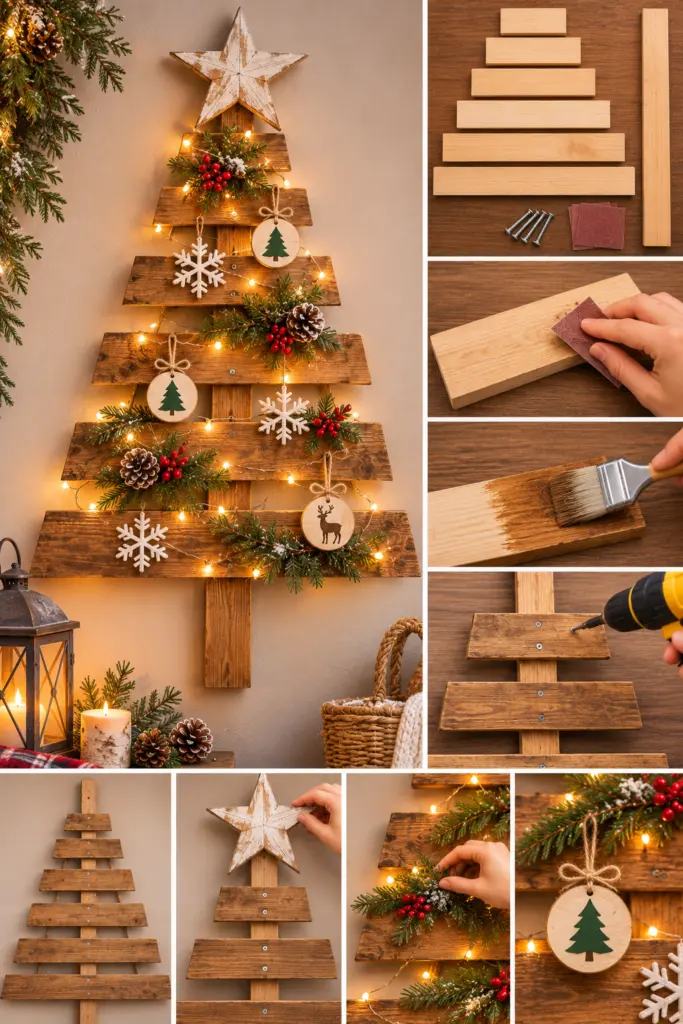
17. Rustic Scrap Wood Christmas Tree Wall Decoration
Finish your collection with a larger wooden Christmas tree that can decorate an empty wall, entryway, or covered porch.
Materials:
- Reclaimed wooden boards
- One long wooden support
- Wood screws
- Sandpaper
- Wood stain
- Greenery and fairy lights
How to make it:
- Select several wooden boards of different lengths.
- Arrange them horizontally, starting with the longest at the bottom.
- Gradually decrease the length of each board to create a tree shape.
- Attach the boards to a vertical wooden support.
- Sand and stain the finished decoration.
- Add greenery, lights, or small ornaments.
Styling tip: Keep the decoration natural for farmhouse interiors or paint it white for a snowy winter look.
Tips for Making Beautiful Scrap Wood Christmas Decorations
Before starting your DIY projects, a little preparation can make a big difference. Here are some useful tips to help your handmade decorations look beautiful and last for several Christmas seasons.
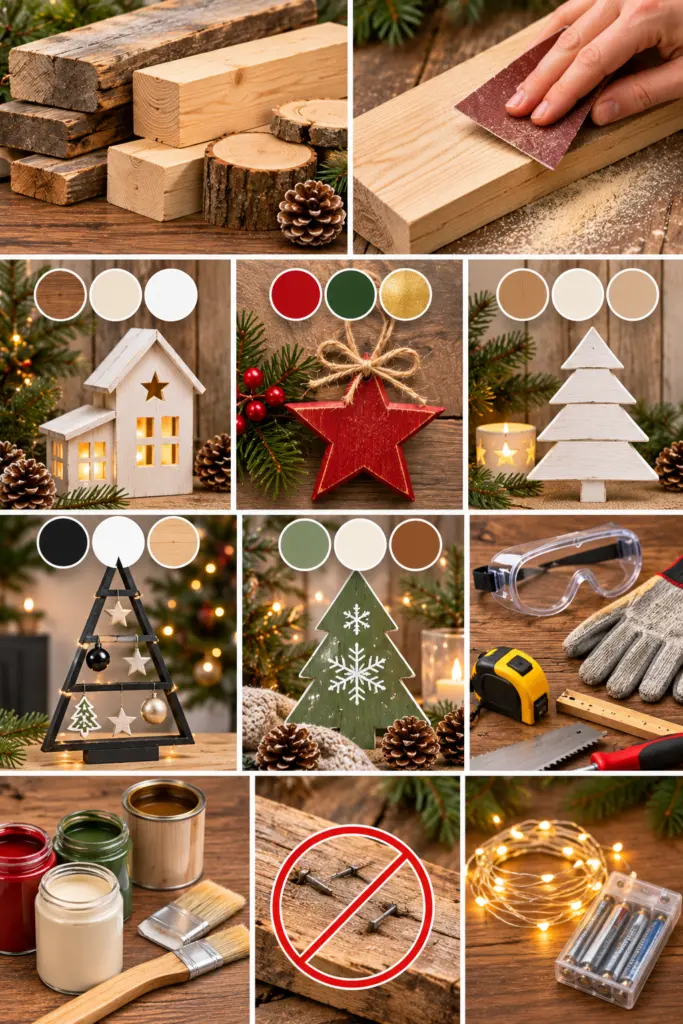
Choose the Right Wood
Not every leftover piece is suitable for indoor decorations. Look for clean, dry, untreated wood without mold, rot, or major damage.
Good options include:
- Pine boards and offcuts
- Untreated pallet wood
- Leftover plywood
- Reclaimed barnwood
- Small wooden blocks
- Dry branches
Avoid using questionable treated or chemically contaminated wood for indoor crafts.
Sand Before Painting
Always sand your wood before applying paint or stain. This creates a smoother surface and helps your finish look more professional.
Start with medium-grit sandpaper and finish with a finer grit.
Choose a Consistent Christmas Color Palette
A coordinated color palette makes even simple handmade decorations look professionally styled.
| Christmas Style | Recommended Colors |
|---|---|
| Rustic farmhouse | Brown, cream, white |
| Scandinavian | Natural wood, white, beige |
| Traditional Christmas | Red, green, gold |
| Modern minimalist | Black, white, natural wood |
| Cozy winter | Sage green, ivory, warm brown |
Use Safe Tools and Finishes
Inspect reclaimed wood for hidden nails and staples before cutting. Wear safety glasses, secure pieces with clamps, and follow the instructions for paints, stains, and adhesives.
Children can help with painting and decorating, but adults should handle saws, drills, and other power tools.
For illuminated decorations, battery-operated LED lights are a safer choice around wooden materials.
Creating beautiful Christmas decorations doesn’t have to be expensive or complicated. With these 17 easy DIY scrap wood Christmas projects, you can transform leftover timber into charming wooden trees, festive ornaments, adorable snowmen, and rustic farmhouse decorations.
The best part is that every project can be personalized with your favorite colors, textures, and holiday details. So, gather your leftover wood, prepare your crafting supplies, and start making something special for the Christmas season!